How to Use OpenAI Codex with a Visual Workspace
Step-by-step guide to using OpenAI Codex with a visual workspace: install the CLI, set AGENTS.md, run sessions in Nimbalyst, review diffs, and plan in markdown.
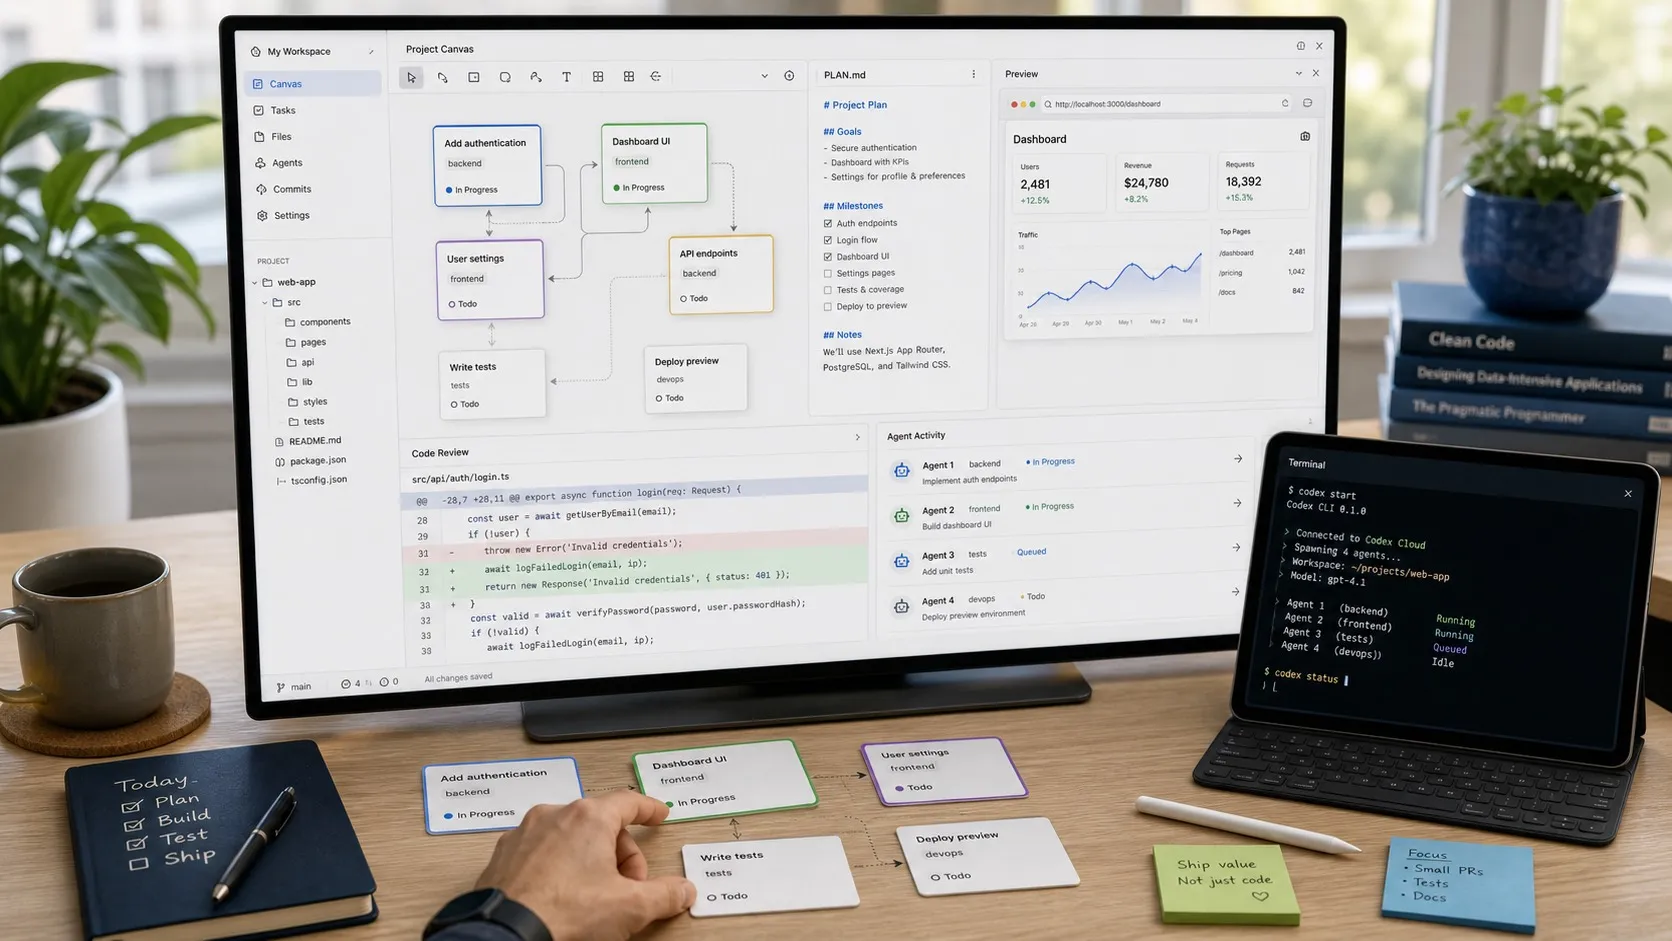
OpenAI’s Codex CLI is fast and powerful out of the box, but the terminal is a thin surface for real work. Once you are reviewing more than a handful of diffs a day, planning multi-step features, or running more than one Codex session at a time, you start to want a visual workspace around the agent.
This guide walks through how to use OpenAI Codex with a visual workspace from setup to a full review-and-ship loop. The walkthrough uses Nimbalyst, an open-source workspace that runs Codex as a first-class engine, but most of the patterns translate to any Codex GUI.
What you will be able to do at the end
- Run Codex sessions inside a visual editor instead of a terminal
- Edit
AGENTS.mdin WYSIWYG markdown with inline AI diffs - Review every Codex change file by file, accept or reject inline
- Run several Codex sessions in parallel, each on its own branch
- Plan features in markdown documents the agent reads from
- Monitor sessions from your phone while you are away from the laptop
Step 1. Install the Codex CLI
The visual workspace runs the actual Codex CLI under the hood, so install it first.
npm install -g @openai/codex
codex --version
Authenticate with your OpenAI API key or sign in with your ChatGPT plan.
codex loginVerify Codex works in a small repo before adding the visual layer:
cd ~/some-test-repo
codex
If you get a working session, the engine is fine. Now you can wrap it.
Step 2. Install the visual workspace
Download Nimbalyst for macOS, Windows, or Linux from the download page, or build from source on GitHub. The desktop app is MIT licensed and free for individual use.
After installing, open Nimbalyst and add your project folder. The workspace detects your AGENTS.md, your .git directory, and any existing Codex configuration automatically.
Step 3. Write a real AGENTS.md
The biggest single quality jump for Codex sessions comes from a well-written AGENTS.md. This is the file Codex reads at the start of every session. Treat it like onboarding documentation for a new engineer.
In the workspace, open AGENTS.md in the WYSIWYG markdown editor. Write something like:
# AGENTS.md

## Project context
This is a TypeScript Astro site deployed to Cloudflare Pages.
Content lives in src/content/, components in src/components/.

## Conventions
- Tailwind utility classes only, no inline style attributes
- All copy lives in src/data/*.yaml, not in component files
- Run `npm run build` before declaring a task done

## Commands
- `npm run dev` for local preview (do not run, the user does that)
- `npm run build` for production build with Pagefind indexing

## Out of scope
- Do not modify .env or wrangler.toml
- Do not add client-side JS frameworks
In a visual editor you can ask Codex itself to draft or refine AGENTS.md. Every change is shown as an inline red and green diff before it lands, so you keep editorial control without leaving the document.
Step 4. Start a Codex session in the workspace
In Nimbalyst, open a new session and pick Codex as the engine. Type a prompt the way you would in the terminal:
Add a `Last updated` line under each blog post title using the post's
`updated` frontmatter field if present, falling back to `date`.
The session opens with a chat panel on one side and your file tree on the other. As Codex works, files it touches appear in a per-session “files edited” sidebar. No more searching git status to figure out what changed.
Step 5. Review every diff visually
This is the part that makes the visual workspace pay for itself.
When Codex finishes (or pauses to ask a question), open the diff viewer. Every file Codex touched appears as a red-and-green inline diff. You can:
- Accept a file’s changes whole
- Reject changes you do not like
- Edit a change inline and re-run the agent against the corrected file
For markdown changes, the diff is shown in the rendered document, not the raw markdown. For mockups or diagrams, the diff is visual: you see the actual UI or graph change, not JSON. For data models, you see schema changes drawn out, not raw Prisma.
This is the workflow Codex’s terminal output does not give you. It is the difference between “trust and merge” and “review and ship.”
Step 6. Run a second Codex session in parallel
Open a new session. Pick Codex again. Optionally enable “git worktree” to run this session on its own checkout in a sibling directory, isolated from the first.
Now you have two Codex agents running in the same project, each on its own branch, each visible on the kanban board with status, current file, and last action. Repeat for as many sessions as you want.
A common pattern:
- Session A: large refactor on a feature branch
- Session B: small bug fix on a hotfix branch
- Session C: scaffolding a new component on its own branch
- Session D: writing tests for the merged refactor
The kanban shows you which sessions need input, which finished, and which crashed.
Step 7. Plan features in markdown the agent reads from
For anything bigger than a one-shot prompt, write a plan document. In the workspace, create plans/feature-name.md and structure it:
# Feature: User profile page

## Goal
Add a profile page at /u/[username] showing the user's avatar, bio, and last 10 sessions.

## Constraints
- Must use existing auth middleware
- Must work with our existing Prisma schema, no migrations
- Must pass type check and tests before merge

## Tasks
- [ ] Add the route
- [ ] Add the data loader
- [ ] Add the component
- [ ] Add the test
Then start a Codex session and tell it to “execute the plan in plans/user-profile.md, marking each task as you finish it.” Codex updates the plan in place as it works, and the diff viewer shows the checkbox flips and any new sub-tasks the agent added.
Step 8. Monitor from your phone
If your workspace ships a mobile companion (Nimbalyst has an iOS app), pair it with your desktop. From your phone you can:
- See which Codex sessions are running, paused, or done
- Review diffs and accept or reject changes
- Answer Codex prompts when an agent needs input
- Start new sessions
The point is not “code from the toilet.” The point is that an agent that finishes while you are in a meeting does not have to sit idle until you are back at your laptop.
Common questions
Do I still need the Codex CLI installed? Yes. The visual workspace runs the real CLI under the hood. Your existing CLI auth, AGENTS.md, and approval policies all still apply.
Does this work with the official Codex desktop app? They are different tools. The official app is a clean Codex-only chat GUI. Nimbalyst is a multi-engine visual workspace that adds editors, diff review, planning, and Linux support. You can use both if you want.
What about Claude Code? The same workspace runs Claude Code. Pick whichever engine fits the task: Codex for fast scaffolding, Claude Code for deep refactors. See Claude Code vs Codex CLI: when to use which.
Is it free? The Nimbalyst desktop app is free for individual use and open source under MIT. You bring your own OpenAI API key for Codex.
Where to go next
Related posts
-
How to Run Multiple Codex Agents in Parallel
Run multiple Codex agents in parallel with git worktrees, the official Codex app, terminal multiplexers, or a kanban workspace. Commands and tradeoffs.
-
Best Codex GUI 2026: 4 Codex Desktop Apps Compared
Codex GUI compared in 2026: OpenAI Codex App, CodexMonitor, CloudCLI, and Nimbalyst. Parallel sessions, worktrees, Linux support, and the best pick per workflow.
-
Codex CLI Tips and Workflows to Get You Started
Practical tips, workflows, and configuration for OpenAI Codex CLI: AGENTS.md setup, approval policies, cloud sandboxes, and GitHub integration.