Developer
Validate and auto-fix
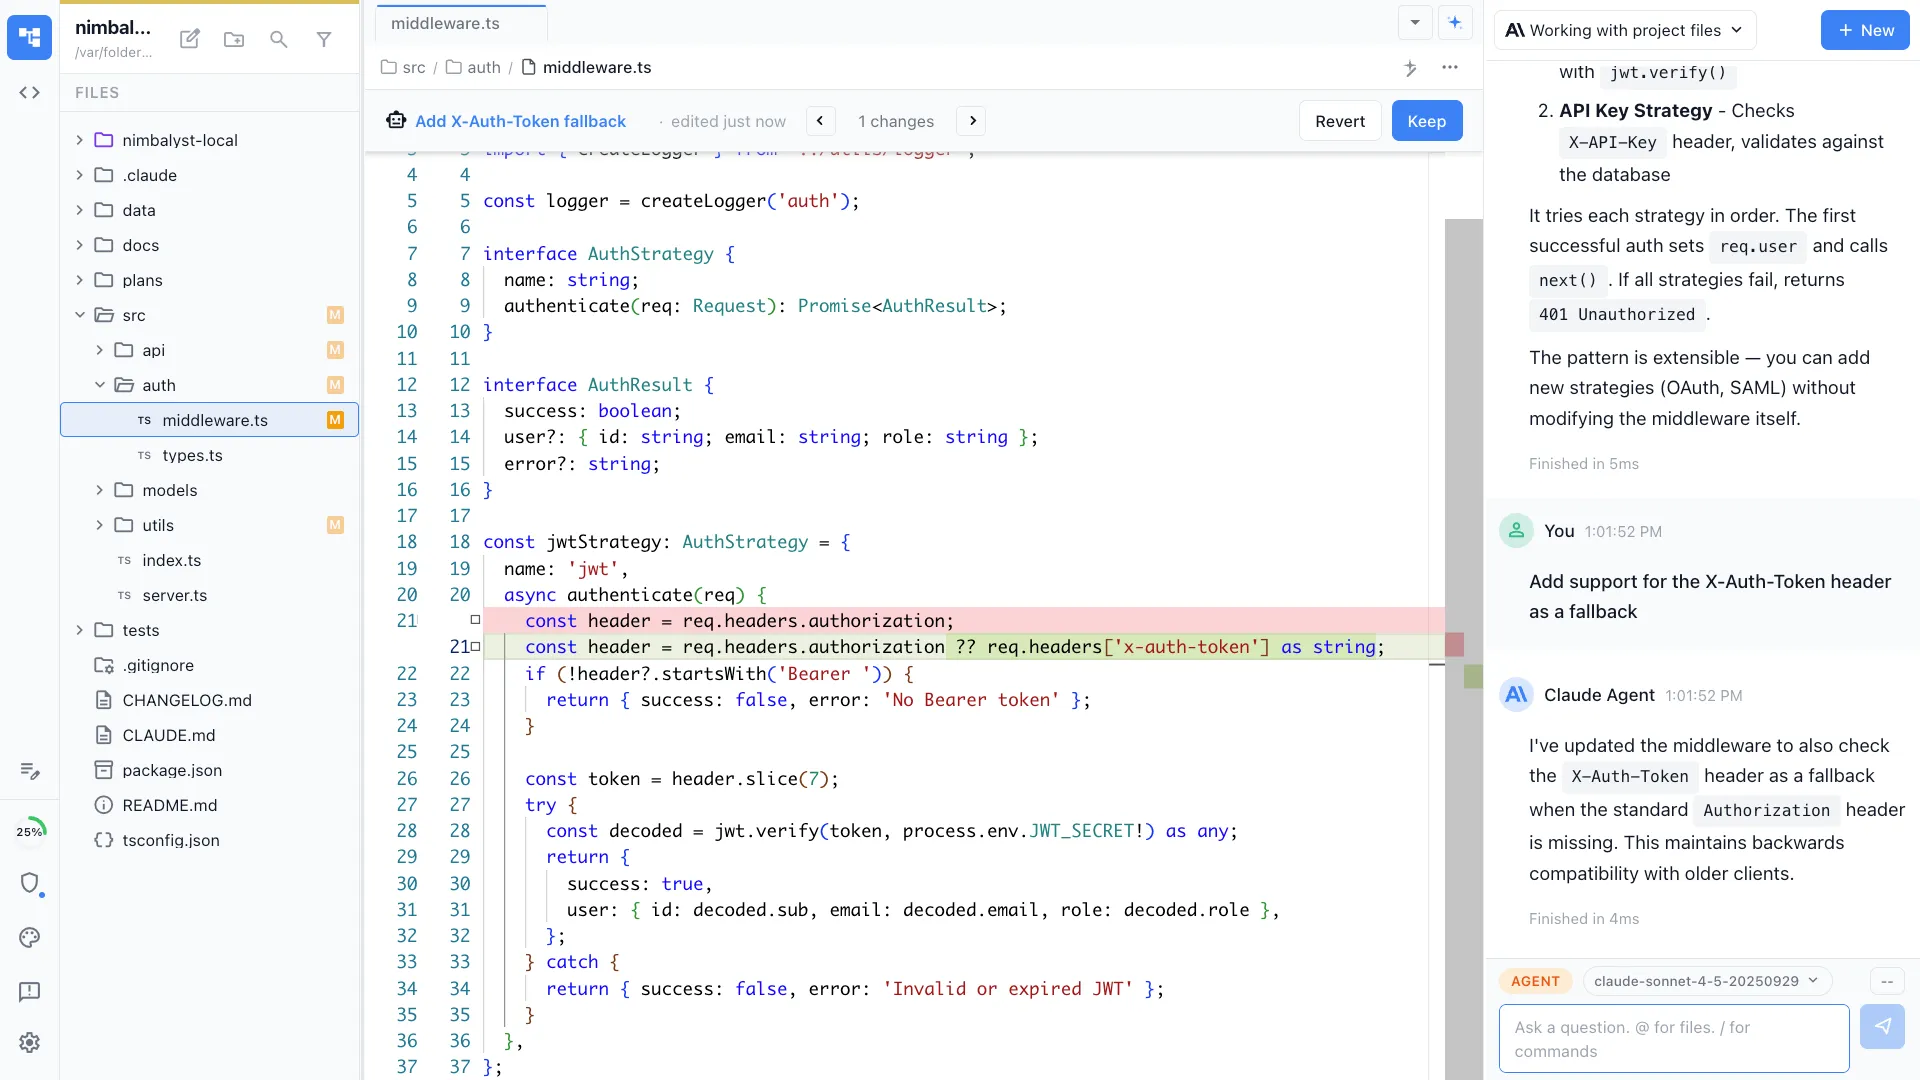
Run /validate-and-fix and the agent checks your code against requirements — runs tests, checks types, verifies behavior — and automatically fixes any issues found.
Validate code against requirements and auto-fix issues found. Runs tests, checks types, verifies behavior, and fixes problems automatically.

Capabilities
Catch and fix automatically
Multi-layer validation
Checks type safety, test results, lint rules, and behavioral requirements. Every layer of validation in a single command.
Auto-fix loop
When issues are found, the agent fixes them and re-validates. It iterates until all checks pass or reports what it couldn't resolve.
Clear reporting
See exactly what was checked, what failed, what was fixed, and what needs manual attention. No mystery about the state of your code.
How It Works
How /validate-and-fix works
Type /validate-and-fix
Run the command after making changes. Optionally specify which requirements or tests to validate against.
Agent validates everything
Tests run, types check, lint rules apply, and the agent verifies behavioral requirements against your specifications.
Auto-fix and report
Issues get fixed automatically. The agent reports what it found, what it fixed, and anything that needs your manual review.
Try It
Example prompts
/validate-and-fix /validate-and-fix check against the requirements in plan.md /validate-and-fix run all tests and fix failures Full Skill Source
Use this skill in your project
Copy the full text below or download it as a markdown file. Place it in your project's .claude/commands/ directory to use it as a slash command.
---
name: validate-and-fix
description: Validate code against a set of requirements or acceptance criteria and automatically fix any violations found. Use when checking implementation correctness or enforcing standards.
allowed-tools: ["Read", "Edit", "Write", "Bash", "Glob", "Grep"]
---

# /validate-and-fix

Validate code against requirements, acceptance criteria, or coding standards, then automatically fix any issues found.

## What This Command Does

1. Reads the requirements source (plan file, PRD, issue, or inline criteria)
2. Identifies all files relevant to those requirements
3. Runs validation checks against each requirement
4. Categorizes findings by severity (blocking, warning, info)
5. Automatically fixes blocking and warning issues
6. Produces a validation report showing what passed, what failed, and what was fixed

## Usage

```
/validate-and-fix [requirements-source]
```

**Examples:**
- `/validate-and-fix nimbalyst-local/plans/user-auth.md` -- validate against a plan's acceptance criteria
- `/validate-and-fix "All API endpoints must return JSON with status codes 200, 400, 404, 500"`
- `/validate-and-fix src/requirements.md`
- `/validate-and-fix` -- validates against the most recently opened plan file

## Execution Steps

1. **Parse the requirements source**

   Depending on the input type:

   - **Plan file (.md with frontmatter)**: Extract acceptance criteria, implementation tasks, and any code standards mentioned
   - **PRD**: Extract P0 and P1 requirements, success metrics, and technical considerations
   - **Inline string**: Parse as a comma-separated or newline-separated list of requirements
   - **No argument**: Look for the most recently modified plan file in the project

   Transform each requirement into a testable assertion:
   ```
   Requirement: "User can reset their password via email"
   Assertions:
   - Password reset endpoint exists
   - Email sending logic is implemented
   - Reset token is generated and validated
   - Password is actually updated after reset
   ```

2. **Discover relevant files**

   - Use the requirements to determine which parts of the codebase are relevant
   - Search for files matching keywords from the requirements
   - Include test files, configuration files, and documentation
   - Build a file manifest: `{ path, relevance_reason, last_modified }`

3. **Run validation checks**

   For each testable assertion, perform these checks:

   **Existence checks:**
   - Does the required function/endpoint/component exist?
   - Are required files present?
   - Do expected exports exist?

   **Correctness checks:**
   - Does the implementation logic match the requirement?
   - Are edge cases handled?
   - Do error paths return appropriate responses?

   **Completeness checks:**
   - Are all acceptance criteria addressed?
   - Are there TODO/FIXME/HACK comments in relevant code?
   - Are required tests written?

   **Standards checks (if applicable):**
   - Does the code follow the project's naming conventions?
   - Are types properly defined (for TypeScript projects)?
   - Are imports organized correctly?

4. **Categorize findings**

   Each finding gets a severity:

   | Severity | Meaning | Auto-fix? |
   |----------|---------|-----------|
   | **BLOCK** | Requirement not met, feature broken | Yes, attempt fix |
   | **WARN** | Partial implementation or quality issue | Yes, attempt fix |
   | **INFO** | Suggestion or minor improvement | No, report only |
   | **PASS** | Requirement fully satisfied | N/A |

5. **Auto-fix blocking and warning issues**

   For each fixable issue:
   - Read the surrounding code context (at least 20 lines above and below)
   - Determine the minimal change needed to satisfy the requirement
   - Apply the fix using Edit tool
   - If a fix requires creating a new file, use Write tool
   - If a fix requires running a command (e.g., installing a dependency), use Bash

   **Fix priorities:**
   1. Fix BLOCK issues first (these prevent the feature from working)
   2. Fix WARN issues second (these affect quality)
   3. Skip INFO issues (report only)

   **Fix constraints:**
   - Never delete existing tests
   - Never change function signatures that are used elsewhere without updating callers
   - If a fix would require changing more than 50 lines, flag it for manual review instead
   - If unsure about a fix, ask the user rather than guessing

6. **Re-validate after fixes**

   - Run the same checks again on modified files
   - Confirm BLOCK issues are resolved
   - Update finding statuses

7. **Generate validation report**

## Output Format

Print a structured report to the terminal:

```
## Validation Report

**Source**: [requirements file or inline criteria]
**Files Checked**: [count]
**Timestamp**: [current time]

### Results Summary

| Status | Count |
|--------|-------|
| PASS   | X     |
| FIXED  | X     |
| WARN   | X     |
| BLOCK  | X     |
| INFO   | X     |

### Requirement Details

#### 1. [Requirement text]
**Status**: PASS / FIXED / BLOCK / WARN
**Files**: [relevant files]
**Finding**: [what was checked and result]
**Fix Applied**: [description of fix, if any]

#### 2. [Requirement text]
...

### Remaining Issues

[List any BLOCK or WARN items that could not be auto-fixed]

### Recommendations

[Suggestions for manual follow-up]
```

## Error Handling

- **Requirements source not found**: Ask the user to provide a valid path or inline requirements
- **No relevant files found**: Warn that the feature may not be implemented yet; ask if they want to scaffold it
- **Fix causes new test failures**: Revert the fix and report it as needing manual attention
- **Ambiguous requirement**: Flag it as INFO with a note asking for clarification

## Best Practices

- Run this command after implementing a feature, before marking a plan as complete
- Use specific, testable requirements for best results
- Review auto-fixes before committing; they solve the immediate violation but may not be the ideal long-term solution
- Pair with `/implement` to validate progress during development
Related Skills
Skills that work well together

Explore More