How to Use Claude Code with a Visual Editor
A practical guide to pairing Claude Code with a visual editor for diff review, session management, planning docs, and visual artifacts. Covers setup, key workflows, and when to stay in the terminal.
The Terminal Gets You 80% There
Claude Code is the most capable AI coding agent available. It reads your codebase, runs tests, manages git, and builds features end to end from a terminal prompt. For pure coding tasks, the terminal is hard to beat.
But most software work is not pure coding. You review diffs across dozens of files. You manage multiple agent sessions running in parallel. You write specs and planning docs that inform what the agent builds. You sketch architecture diagrams and UI mockups before a line of code gets written.
The terminal handles none of this well. If you want to use Claude Code with a visual editor — one that gives you a file tree, diff review, session management, and visual editing tools alongside your agent — here is how to set it up and the workflows that make it worthwhile.
What a Visual Editor Adds to Claude Code
A visual editor for Claude Code is not a replacement for the terminal. It is a layer on top. The agent still runs Claude Code underneath. What changes is everything around it: how you see what the agent did, how you manage multiple agents, and how you create the context that makes agents effective. For a broader look at the options available, see our roundup of the best Claude Code GUI tools.
File tree and workspace navigation. The terminal shows you one file at a time. A visual editor shows your entire project structure, lets you open files in tabs, and gives you the spatial awareness of what exists where. When Claude Code creates or modifies files, you see the changes reflected immediately in the tree.
Visual diff review. Terminal diffs work for small, single-file changes. When an agent refactors 15 files across your codebase, you need a side-by-side diff view with syntax highlighting, red/green change markers, and the ability to accept or reject individual changes. This is the difference between trusting the agent blindly and actually reviewing its work visually.
Session management. Run three Claude Code sessions in the terminal and you have three tabs with scrolling text. Run them in a visual editor like Nimbalyst and you have a kanban board showing each session’s status, what files it changed, and its current task. You can name sessions, group them by workstream, and switch between them without losing context.
Planning and context documents. Claude Code works best when it has clear instructions. A visual editor lets you write specs, planning docs, and task breakdowns in a WYSIWYG markdown editor right next to your agent sessions. The agent can read these docs directly. No copy-pasting between apps. See the full AI coding workspace landscape for how different tools approach this.
Diagrams and mockups. Architecture diagrams, data models, UI mockups — these are the visual artifacts that drive development. In a visual editor, you create and edit them in the same workspace where your agent runs. Claude Code can read from and write to these visual editors, closing the feedback loop between what you design and what gets built.
Setting Up Nimbalyst with Claude Code
Nimbalyst wraps Claude Code (and Codex) with a full visual workspace. Here is how to get started.
1. Install Nimbalyst. Download from nimbalyst.com. It runs as a desktop app on macOS.
2. Open your project. Point Nimbalyst at your git repository. The file tree populates with your project structure. You can open and edit any file in the built-in editor.
3. Start a Claude Code session. Open the AI panel (Cmd+Shift+A) and start a new session. Nimbalyst launches Claude Code underneath and connects it to your workspace. Everything the agent does — file reads, edits, bash commands — appears in the chat transcript with full visibility.
4. Write your context. Before giving the agent a task, create a planning doc or spec in your workspace. Use the WYSIWYG markdown editor to outline what you want built, any constraints, and acceptance criteria. Reference this doc in your prompt so the agent has structured context.
5. Review changes visually. As the agent works, modified files show up with change indicators. Click any changed file to see a full diff view — red lines for deletions, green for additions. Accept or reject changes file by file.
That is the basic setup. The real value comes from the workflows you build on top of it.
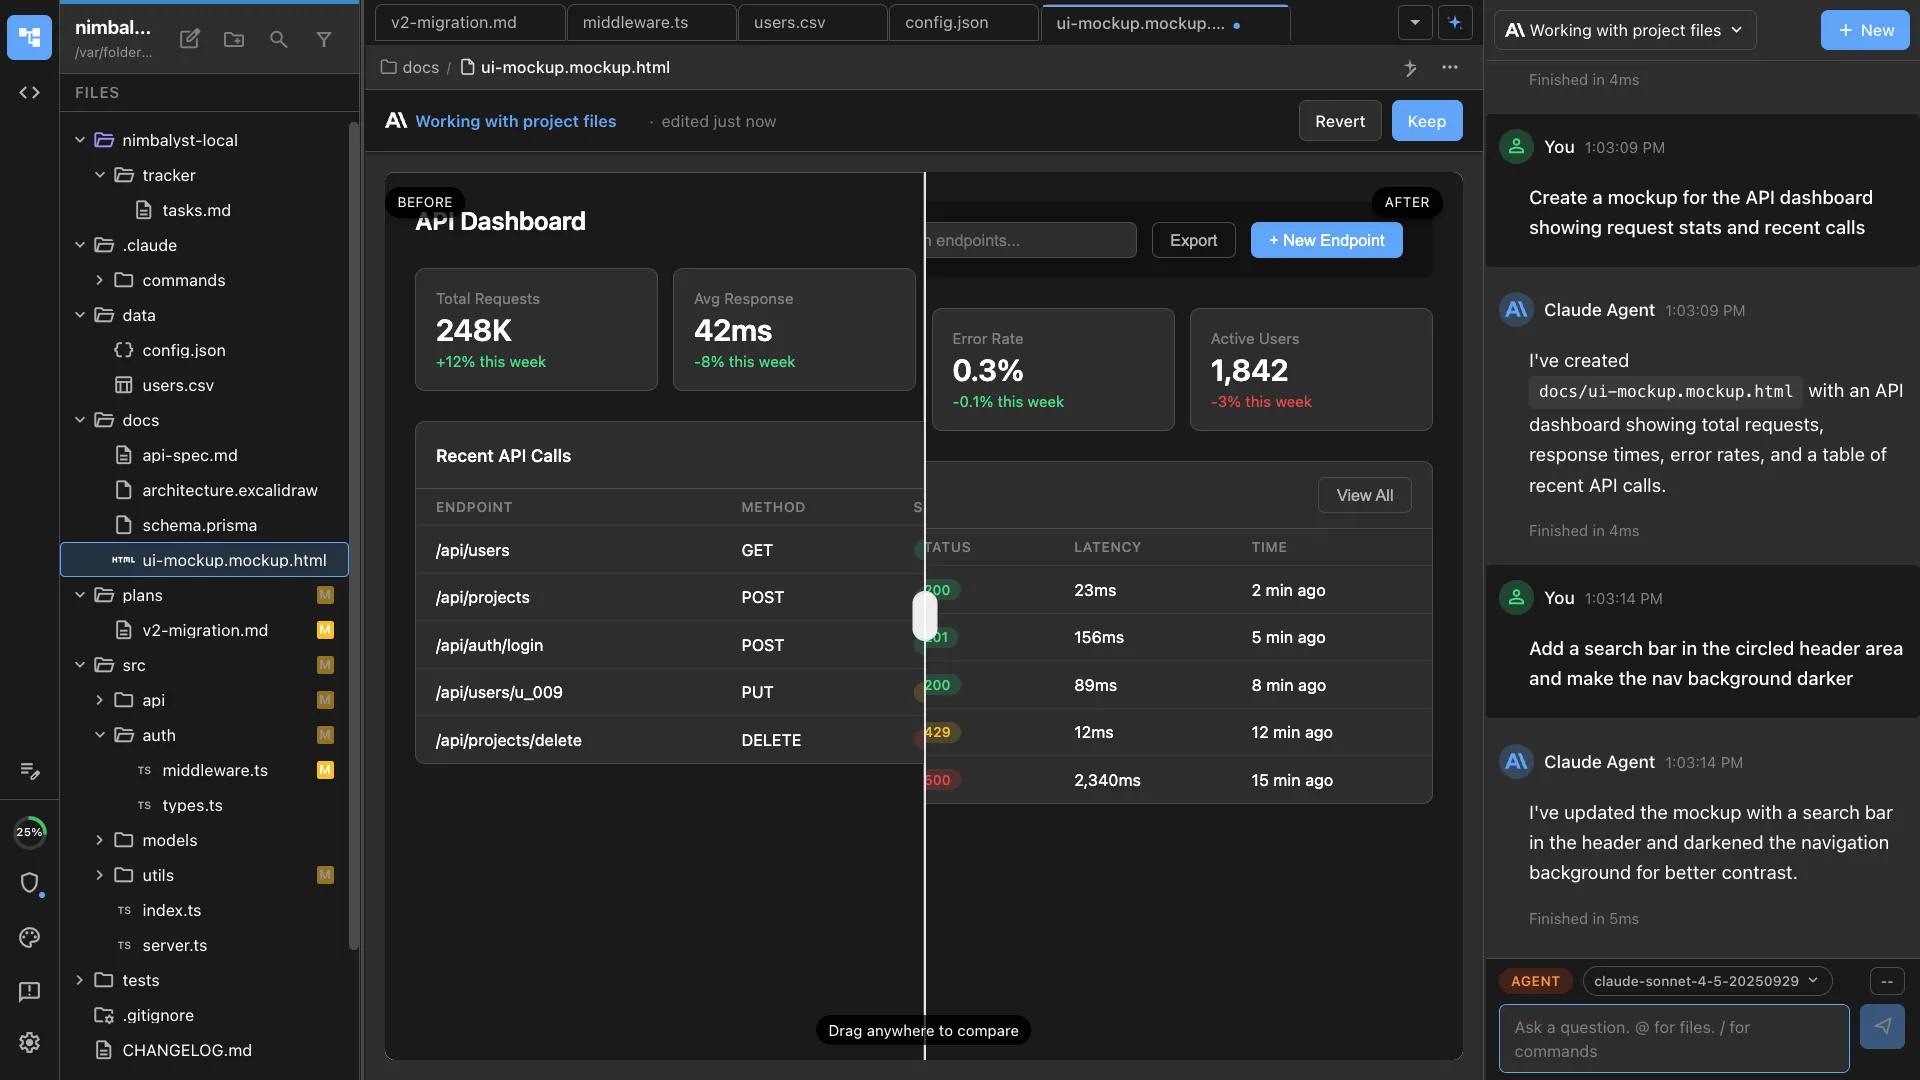
Workflow 1: Reviewing Diffs Visually
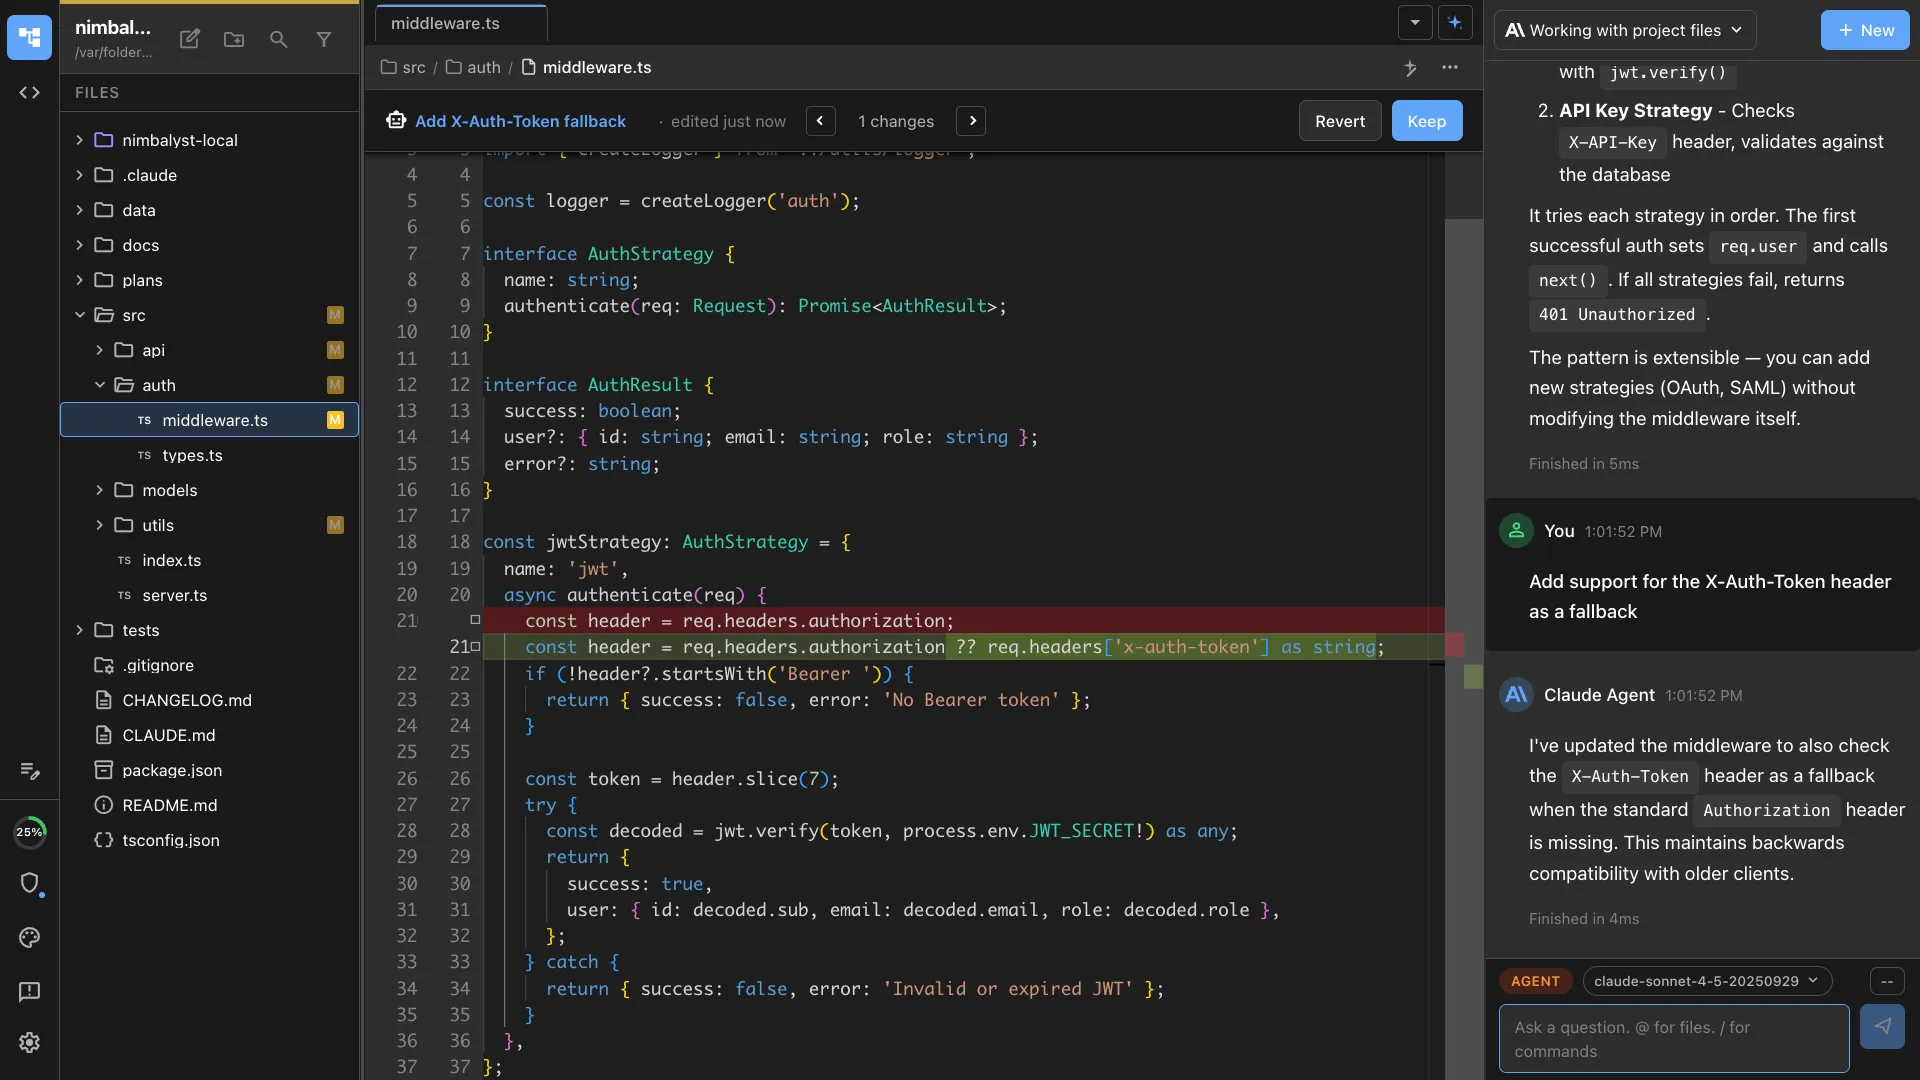
This is the single biggest improvement over terminal-only Claude Code. When the agent modifies code, you need to review what changed before it ships. In the terminal, you run git diff and scroll through raw output. In a visual editor, you click a file and see a formatted side-by-side comparison.
The workflow:
- Give Claude Code a task (“Refactor the auth module to use JWT tokens”)
- Watch the transcript as it works
- When it finishes, open the files changed panel
- Click each file to see the diff
- Accept the changes you agree with, reject or modify the ones you do not
This matters more as tasks get larger. A 3-file change is easy to review in a terminal. A 20-file refactor is not. The visual diff viewer lets you catch issues — wrong imports, deleted test cases, unintended side effects — that you would miss scrolling through raw diff output.
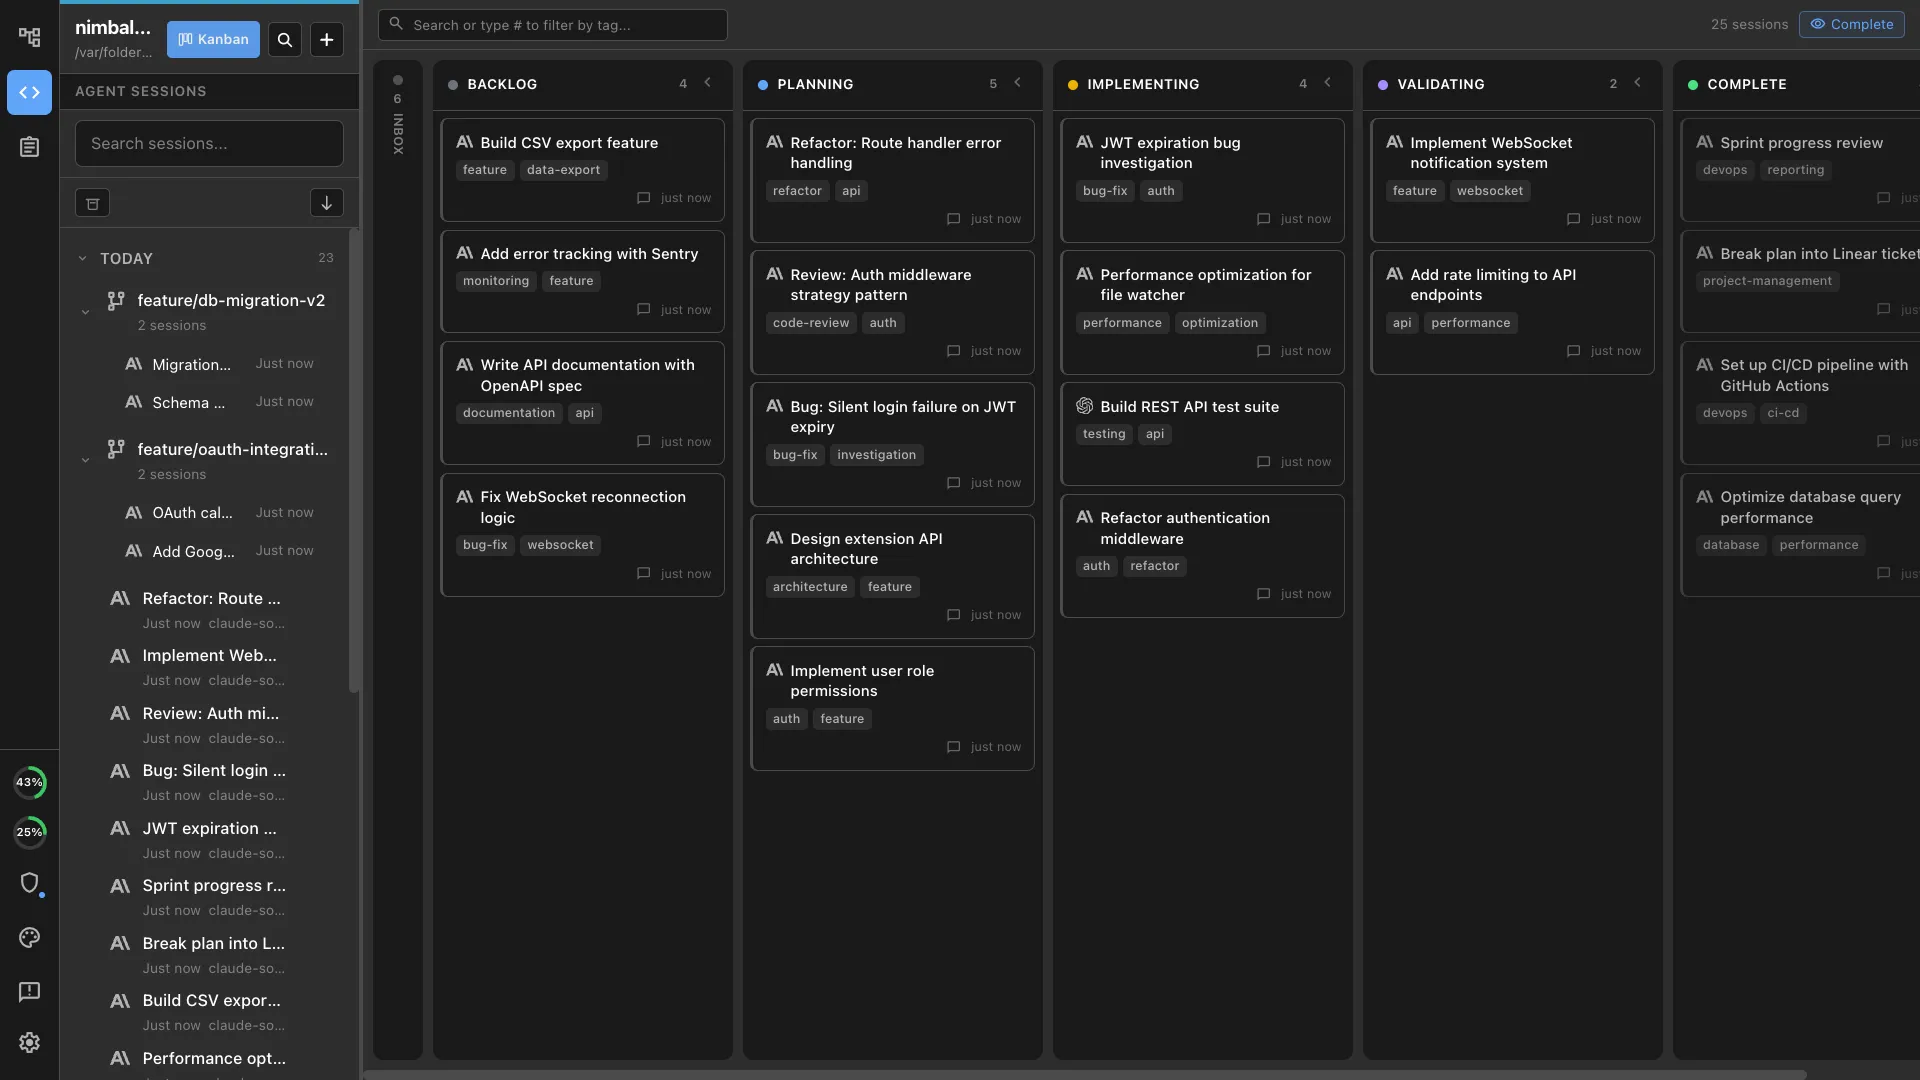
Workflow 2: Managing Multiple Sessions
Running parallel Claude Code sessions is one of the most productive ways to use the tool. One session refactors your backend. Another writes tests. A third updates documentation. But managing all of them in terminal tabs is chaos.
The workflow:
- Start multiple sessions from Nimbalyst’s session manager
- Use git worktrees to give each session an isolated branch (Nimbalyst handles the worktree setup)
- Monitor all sessions from the kanban view — see which are active, which are waiting for input, which finished
- Switch between sessions to review output and provide follow-up instructions
- When sessions complete, review each session’s changes independently before merging
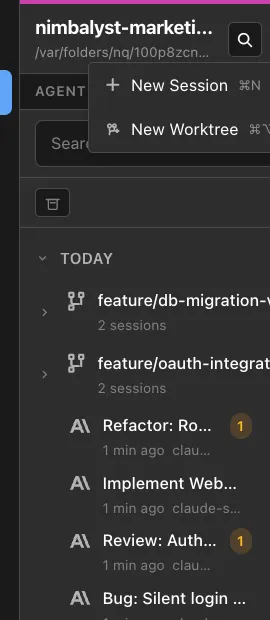
The kanban board turns “three terminal tabs with scrolling text” into “three organized workstreams with clear status.” You can name sessions by task, see what files each one touched, and review changes in isolation before merging branches.
Workflow 3: Planning Alongside Coding
Claude Code’s output quality depends on the quality of the instructions you give it. Vague prompts produce vague results. Structured specs produce structured code.
The workflow:
- Create a planning doc in Nimbalyst’s markdown editor
- Outline the feature: goals, constraints, acceptance criteria, technical approach
- Create supporting artifacts — an architecture diagram in Excalidraw, a data model, a UI mockup
- Start a Claude Code session and reference your planning docs: “Read the spec at docs/auth-redesign.md and implement it”
- The agent reads your structured context and produces better output than an ad-hoc terminal prompt ever would
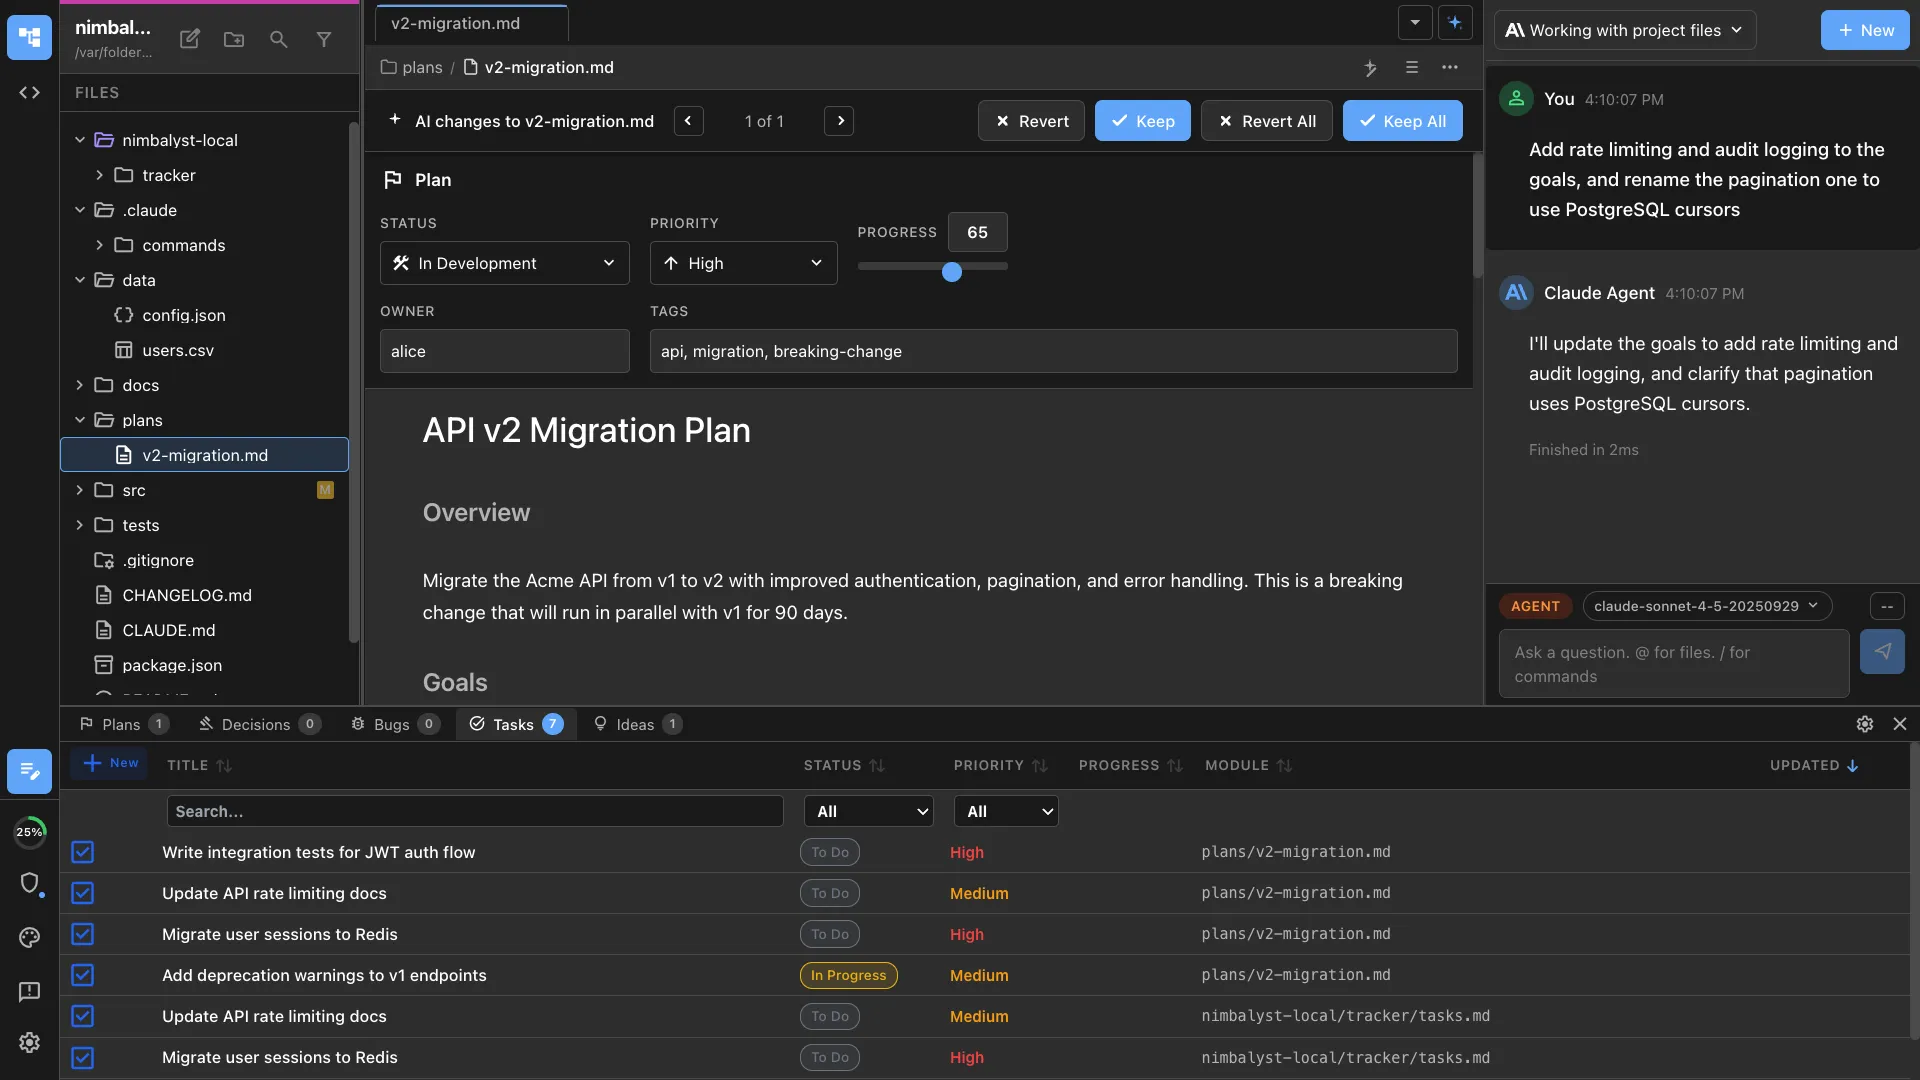
The key insight: planning documents and coding sessions live in the same workspace. No context switching. No copy-pasting between Notion and your terminal. The agent reads the same docs you write.
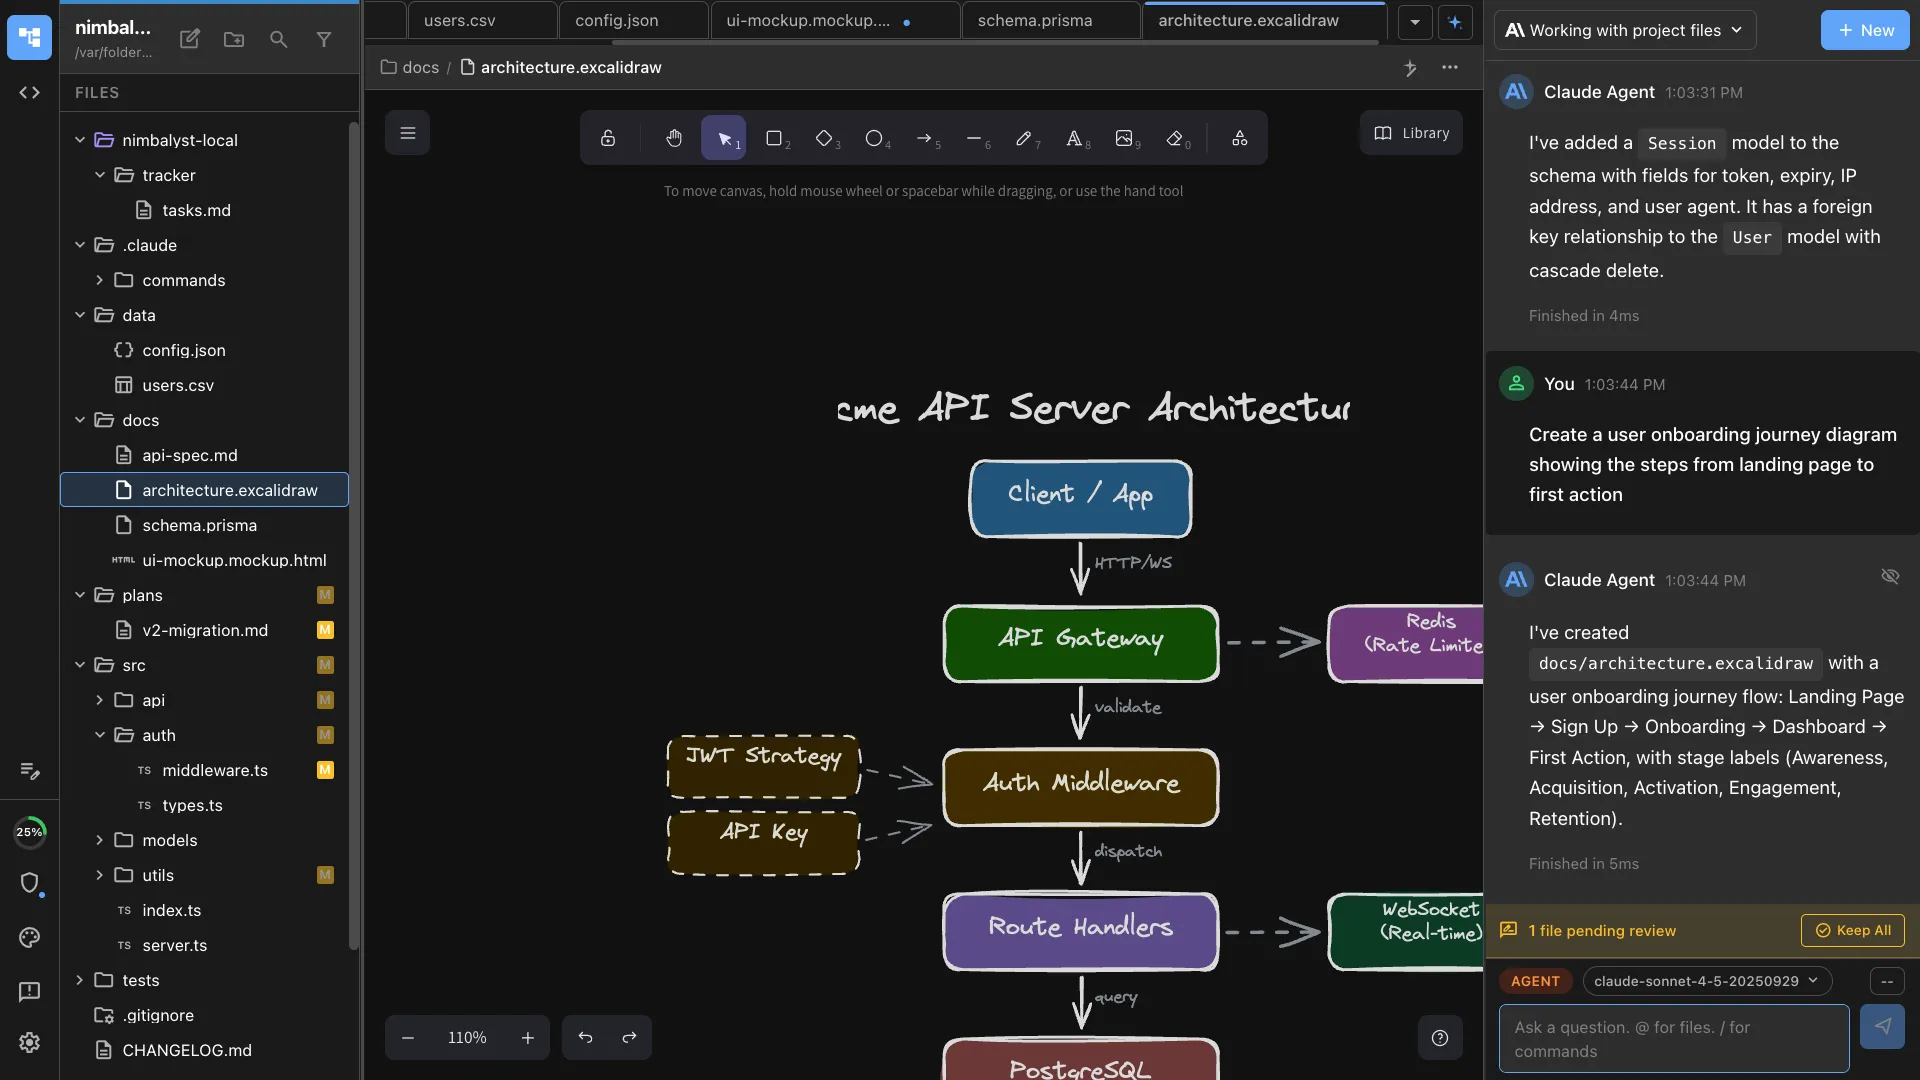
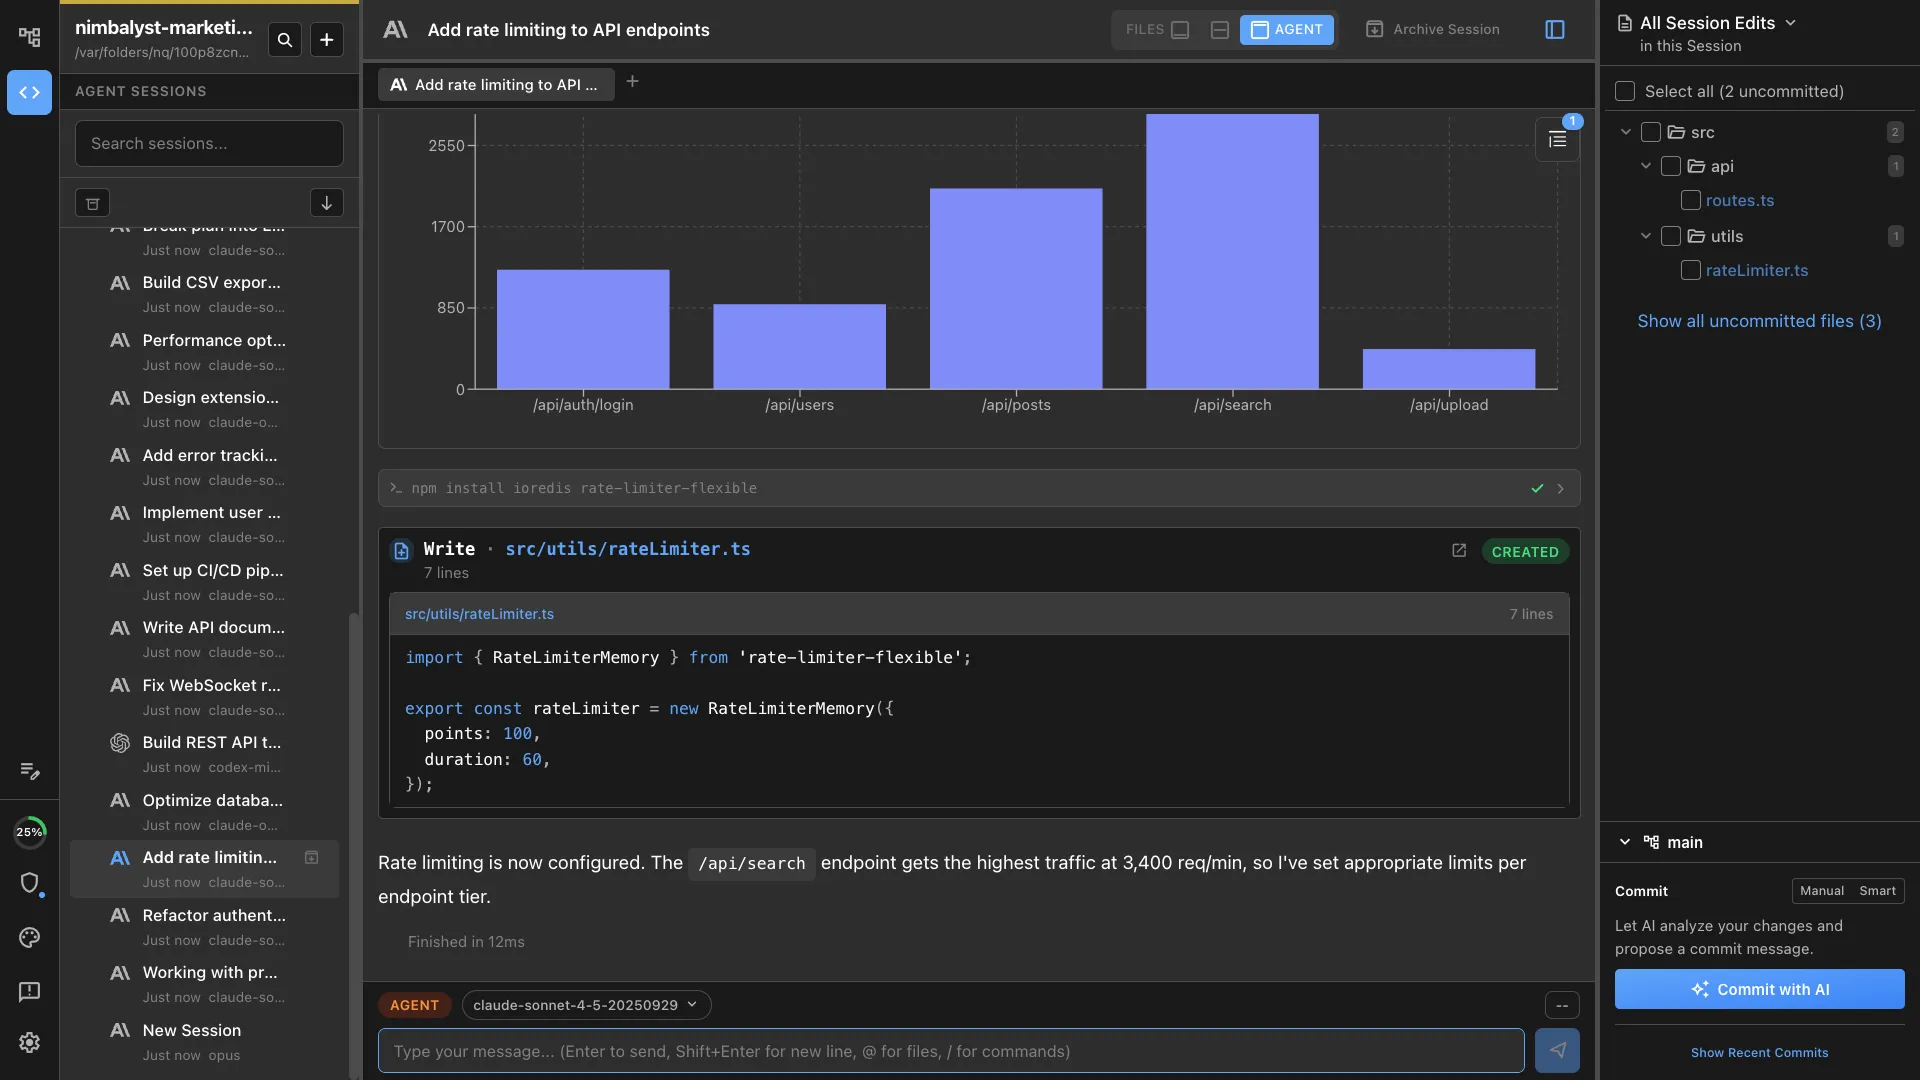
Workflow 4: Visual Artifacts in the Loop
Claude Code is powerful, but it is text-in, text-out. It edits Mermaid diagram source code without seeing the rendered diagram. It writes mockup HTML without seeing what it looks like. A visual editor closes this gap.
The workflow:
- Create an architecture diagram in Nimbalyst’s Excalidraw editor
- Ask Claude Code to update it: “Add a rate limiter between the API gateway and the auth service”
- The agent modifies the diagram and you see the result rendered visually — not as raw markup
- Iterate until the diagram matches your intent
This works for mockups, data models, spreadsheets, and any other visual format. The agent modifies the underlying data. The visual editor renders the result. You provide feedback on what you see, not what you imagine from reading source code.
When to Stay in the Terminal
A visual editor is not always the right tool. Here is when the terminal is better:
- Quick, single-file edits. If you know exactly what you want changed in one file, a terminal prompt is faster than opening a workspace.
- Scripting and automation. Running Claude Code from a CI pipeline or shell script does not need a GUI.
- SSH and remote work. If you are working on a remote server over SSH, a visual editor is not an option (though Nimbalyst’s mobile app can connect to remote sessions).
- Minimal context tasks. “Fix this typo” or “add a docstring to this function” does not need workspace-level tooling.
The decision is about the complexity of the task. Simple, focused tasks belong in the terminal. Multi-file refactors, parallel sessions, planning-heavy work, and visual artifact creation belong in a visual editor.
Worth noting: you do not have to leave Nimbalyst for terminal work. Nimbalyst has an embedded terminal where you can run commands, use Claude Code directly, or do anything else you would do in a standalone terminal — all without switching windows.
Getting the Most Out of Both
Claude Code is the engine. A visual editor is the dashboard. You do not choose one over the other — you use the visual editor to get more out of the agent you already rely on.
The developers and teams getting the most from Claude Code are the ones who pair it with visual tooling for review, management, and planning. They review diffs instead of scanning raw output. They manage sessions from a board instead of terminal tabs. They write structured specs instead of ad-hoc prompts.
If you are already using Claude Code in the terminal and hitting the edges of what terminal workflows can handle, a visual editor like Nimbalyst is the next step. The agent stays the same. Everything around it gets better. Explore all of Nimbalyst’s capabilities on our features page.