How to Keep a Project Wiki with Claude Code
Install the free Nimbalyst Wiki plugin in Claude Code, run setup, and Claude writes a markdown wiki of your decisions, open questions and tracked items in your repo, which you read and edit in your browser.
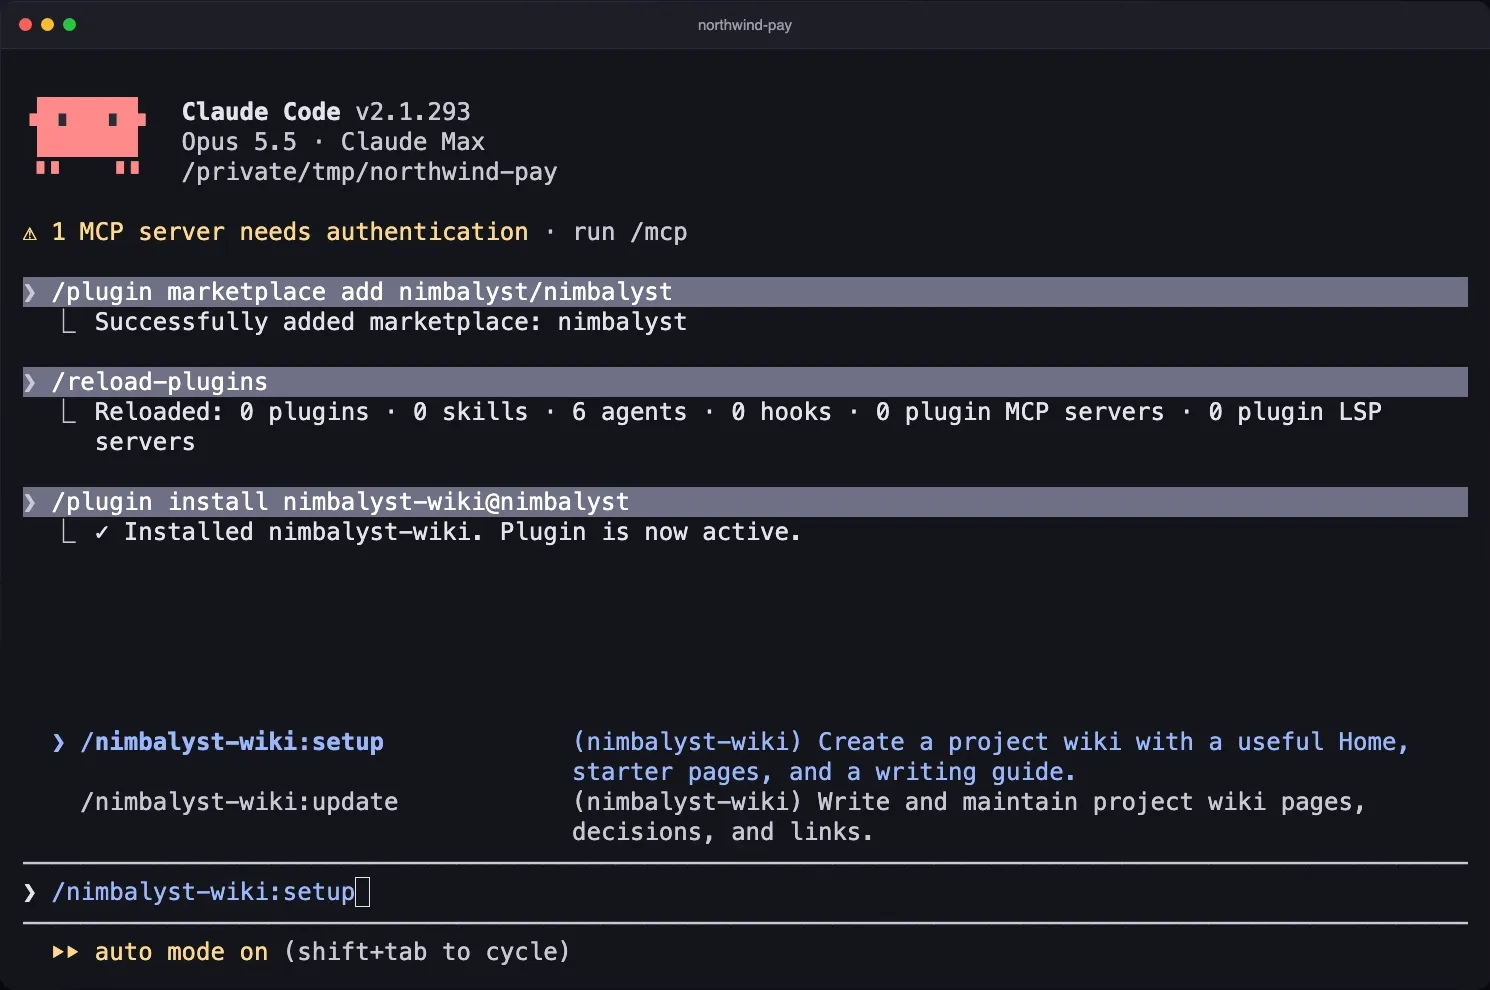
To keep a project wiki with Claude Code, install the free Nimbalyst Wiki plugin, run /nimbalyst-wiki:setup, and Claude writes a wiki of plain markdown files in your repo: a Home page, the decisions you made and why, open questions with owners, and tables of whatever you track. At the end of a session, /nimbalyst-wiki:capture records what was decided in the page it affects. You read and edit the whole thing in your browser, with no app and no account.
This guide walks through the install, the first wiki, the end-of-session habit, and the choices you will want to make about where the files live.
Why keep a wiki next to Claude Code
Run a few Claude Code sessions a day and they produce more plans, changes and decisions than anyone can read. Each session settles something (“store retries in the event queue, not in the payment provider”) and raises something else (“do we need a mobile SDK for launch?”). A week later the decision is buried in a transcript you will never reopen, and the open question is in nobody’s head. We describe how quickly several coding agents outrun what you can track in a separate post.
The wiki is where your agent distills that work for you. You do not write it from scratch and you do not maintain it by hand. Claude writes the pages as part of the work, and you read them to catch up, think, reorder priorities and decide what comes next. When you change a page, the next session starts from what you wrote.
What you need
- Claude Code.
- Node.js 22 or later on your
PATH.
You do not need the Nimbalyst app or a Nimbalyst account. The plugin and everything it installs are MIT licensed, and the source is on GitHub.
Step 1: Install the plugin
In Claude Code, add the marketplace and install the plugin:
/plugin marketplace add nimbalyst/nimbalyst-wiki
/plugin install nimbalyst-wiki@nimbalyst-wiki
The plugin adds two local MCP servers, which /mcp lists:
| Server | What it does |
|---|---|
nimbalyst-local | Reads and writes the wiki and runs its browser view. It runs on your machine and needs nothing else installed. |
nimbalyst-session | Lets the agent quote what you typed in this session when it records a decision. It reads only this session’s transcript, on your machine. |
It also adds two hooks. When a session starts, the agent hears what your wiki covers and which pages cover the files you have changed. When a session with a commit, a plan or several file edits ends, the agent is reminded once to record what you decided.
For a short tour of what the plugin does before you build anything, run /nimbalyst-wiki:start. The install docs for every agent cover the other routes.
Step 2: Run setup and let Claude build the first wiki
/nimbalyst-wiki:setupSetup starts by reading your README, your docs and anything else the repo says about itself. Then it asks a few questions in one prompt, with every answer pre-filled from what it found, so you correct a draft instead of writing one: who the wiki is for, which sections you want, the parts of the product, the work under way, who owns what, and the strategy if you want one recorded.
The default is a strategic project wiki. Home works as a dashboard of the big picture, and behind it sit pages for the product and its modules, the initiatives under way, decisions, the team and strategy. A research notebook or a personal reference can be much smaller, and setup follows your answers.
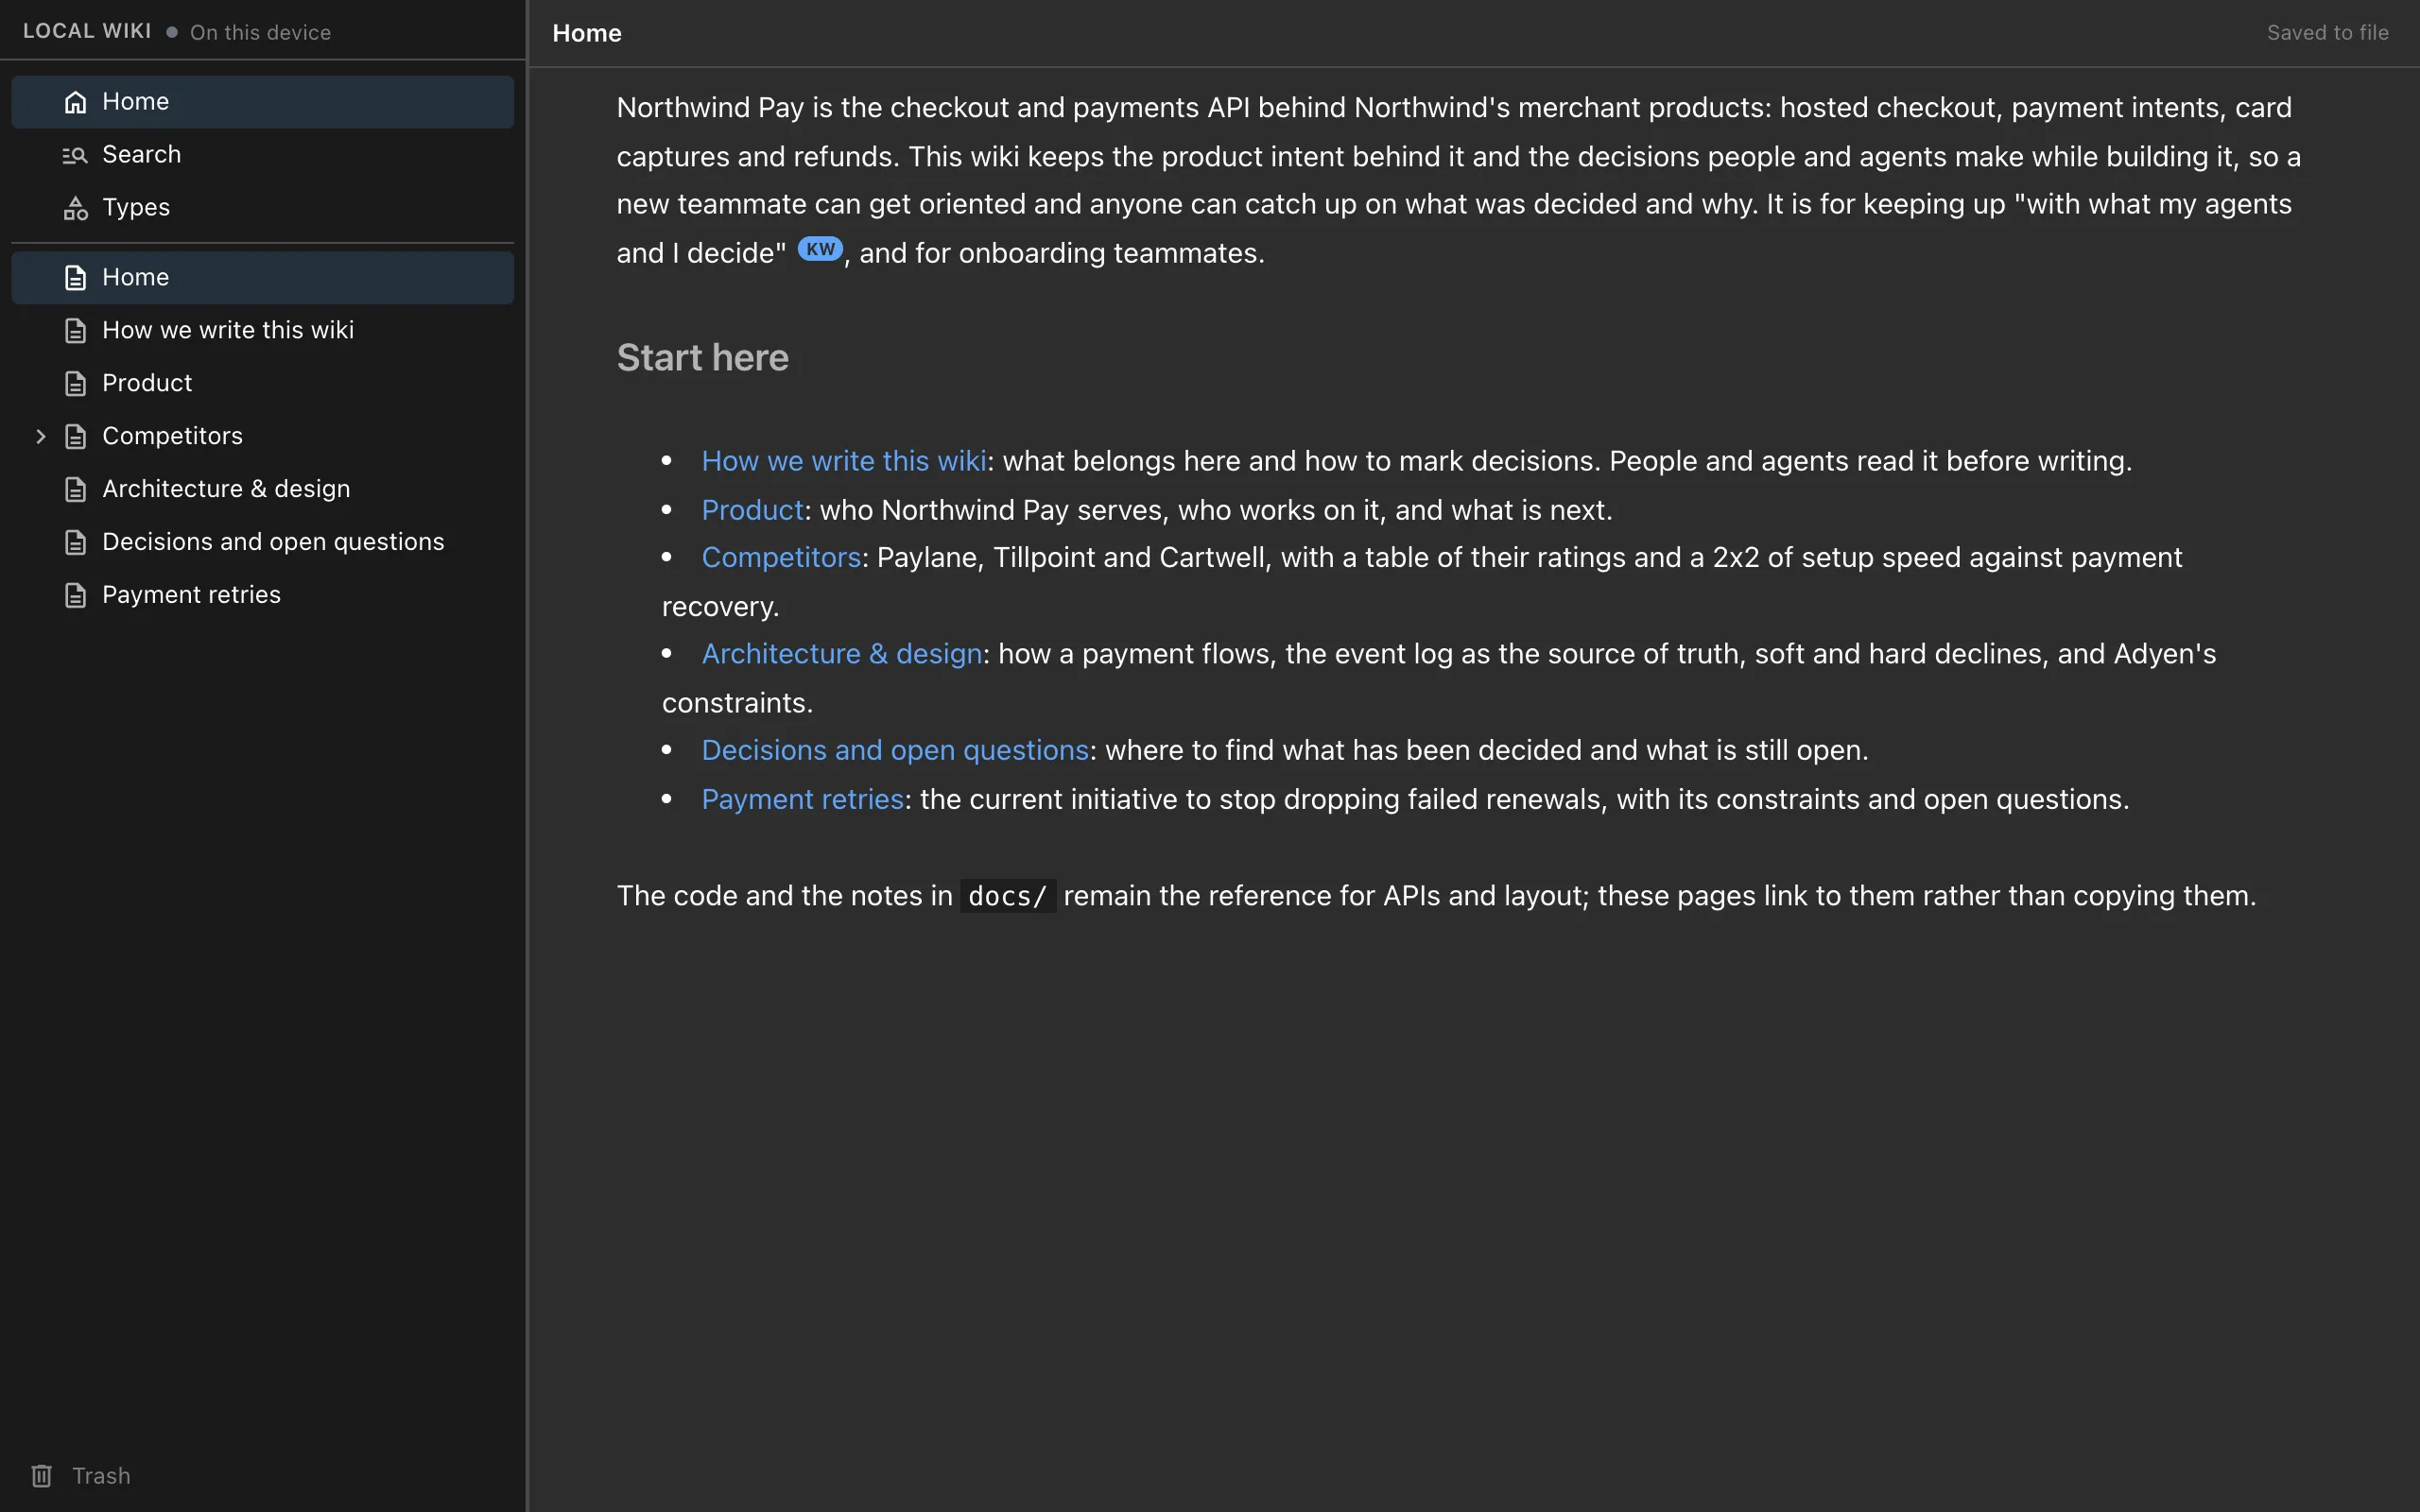
When it finishes you have three things:
- A Home page that links to every area of the wiki.
- A writing guide, “How we write this wiki”, which every agent follows when it edits a page.
- Starter pages filled in from your repo, so you start with a wiki instead of a blank page.
Running setup again later fills gaps. It never duplicates or overwrites what you or your agent already wrote. The setup docs walk through each step it takes.
Step 3: Capture what you decided at the end of a session
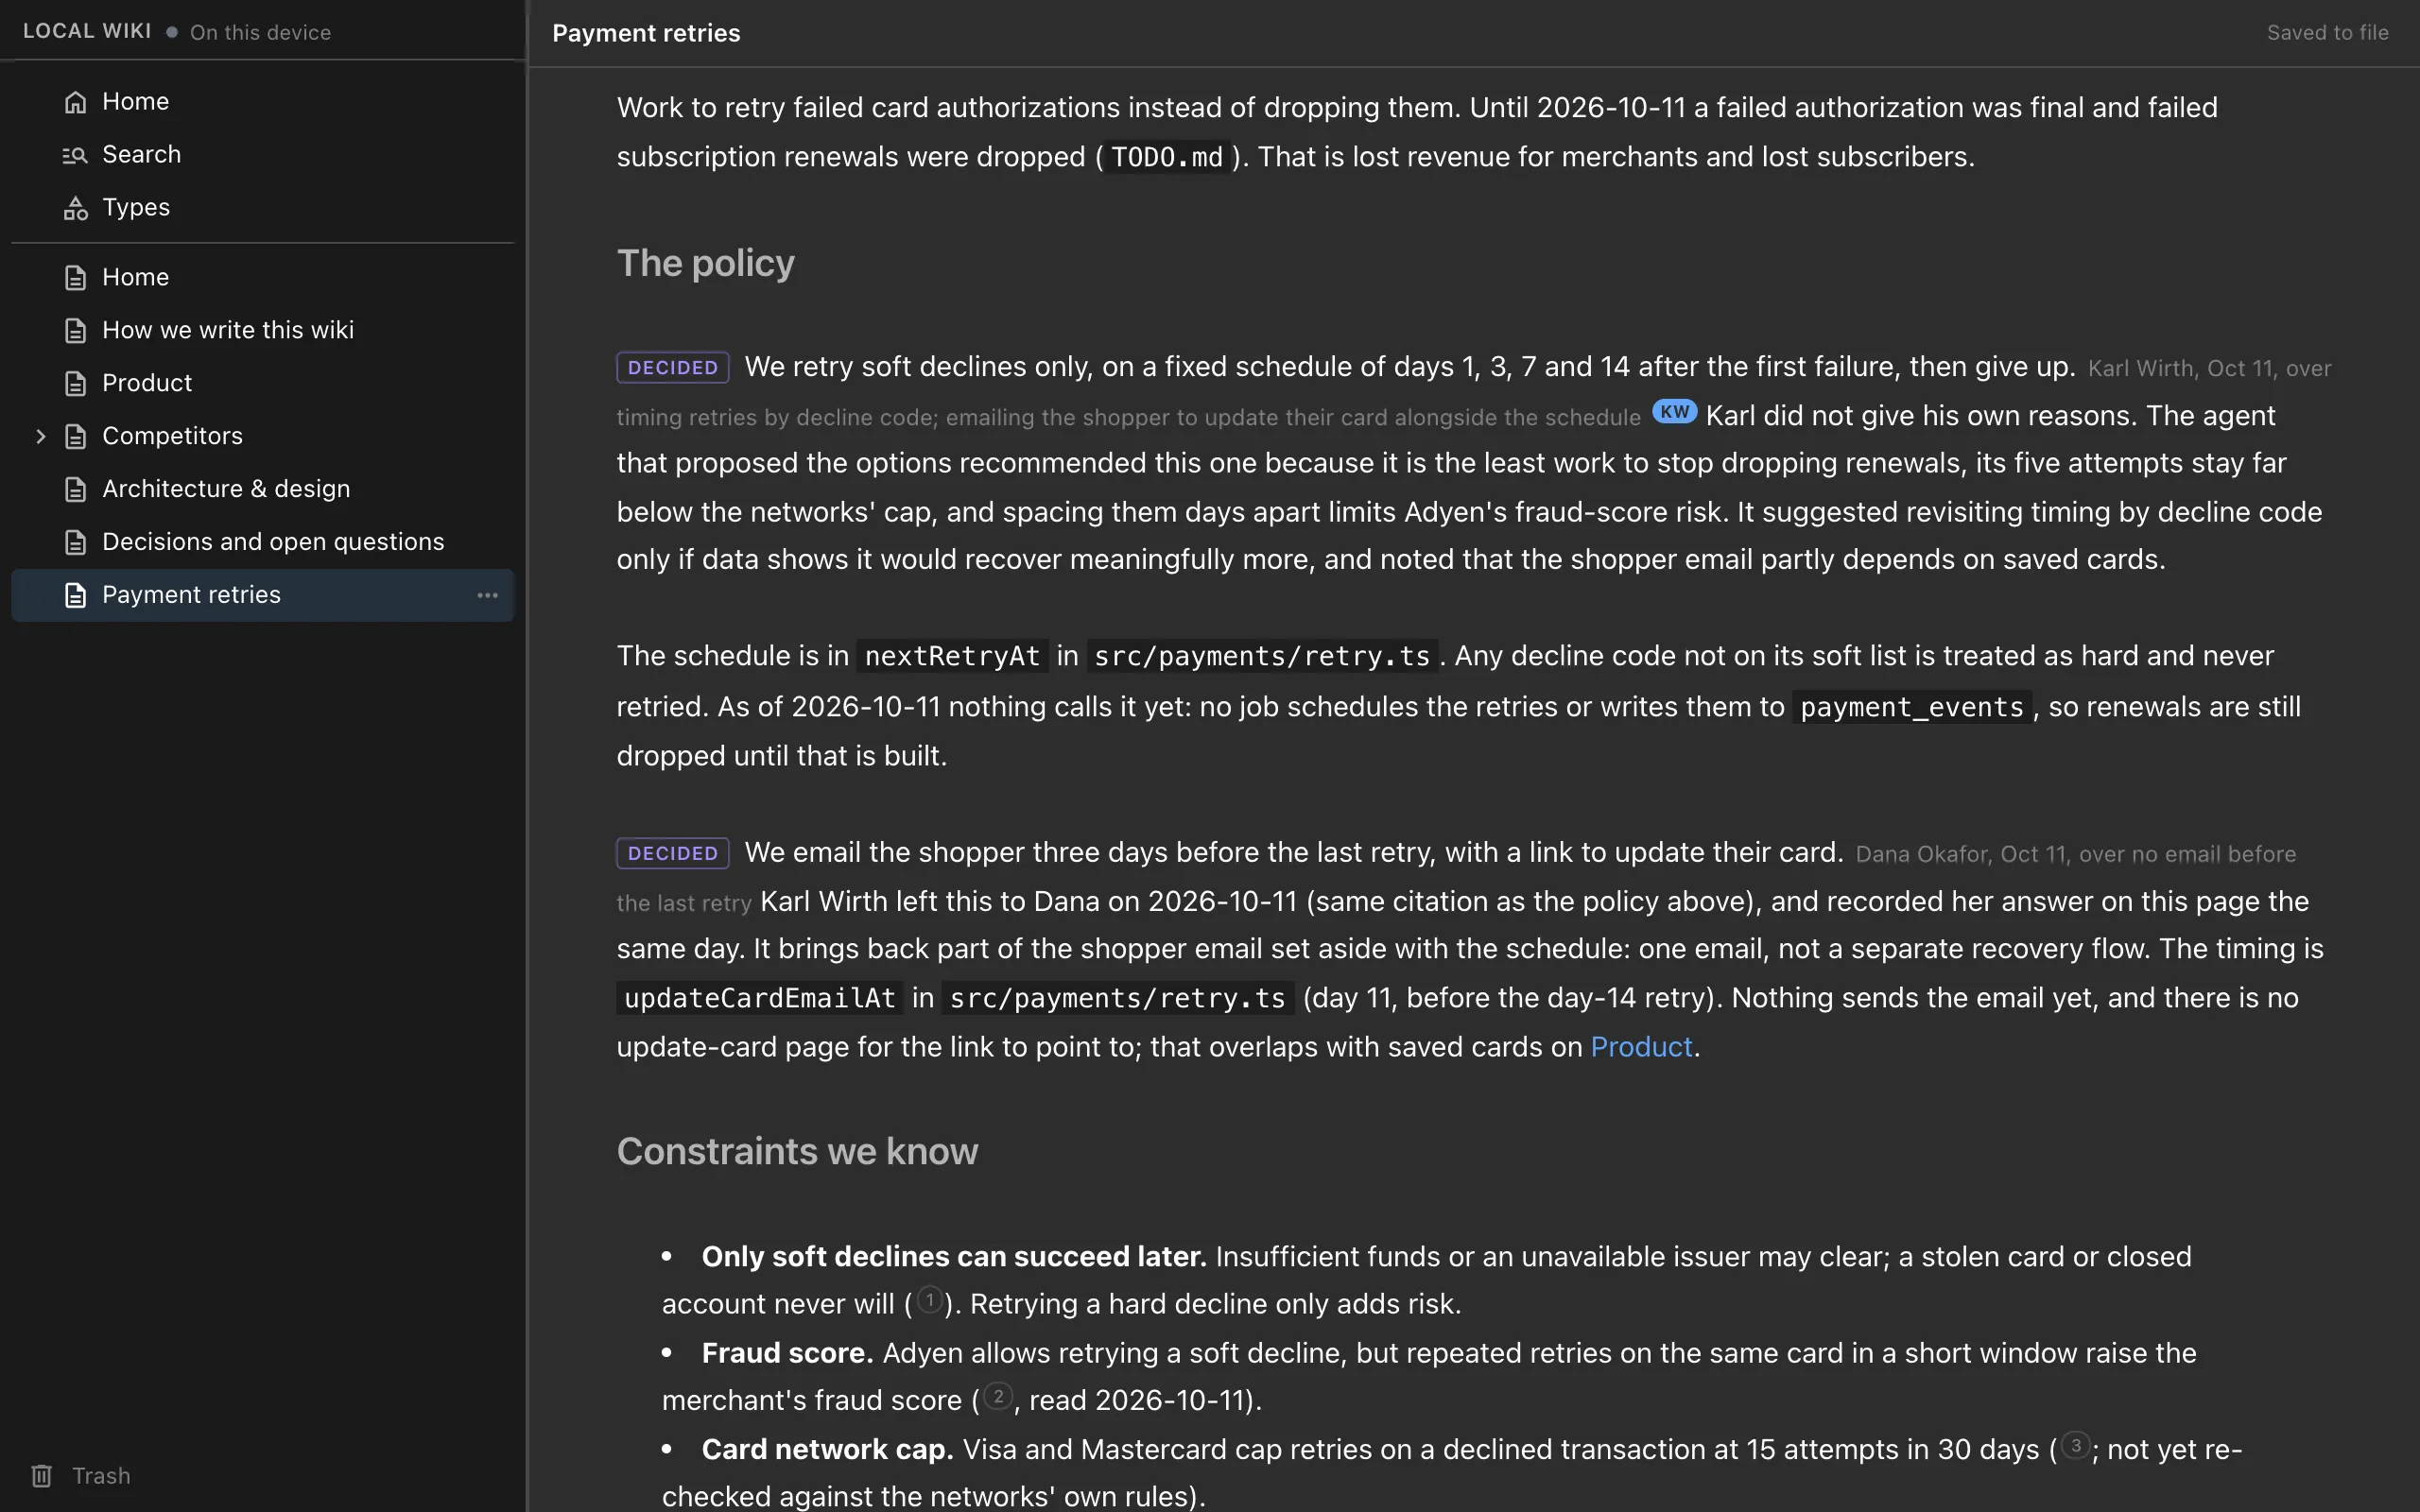
/nimbalyst-wiki:captureCapture looks at what the session changed and decided, finds the page each item affects, and writes it there. A decision becomes a marked sentence in that page, with who decided, when, and what was passed over:
[We store and evaluate flags in Flagship.]{decided by="Dana Lee" [email protected] on=2026-09-30 over="our own Durable Object store"}Open questions use the same form with an owner: [Do we need a mobile SDK for launch?]{open by="Dana Lee"}. When your own words in the session support a statement, the agent adds a citation copied from the transcript. It never invents a decision, a reason or a quote. On a local wiki, the name and email come from your git config.
Capture also starts from the code. It finds the pages that cover the files the session changed and updates what the change means for a reader, or marks a page outdated when it cannot say that well. If nothing in the session is worth keeping, it says so and writes nothing. The capture docs list each step, and our post on architecture decision records your coding agent writes shows how these marks replace a hand-kept decision log.
You do not have to remember to run it. After a session with a commit, a plan or several file edits, Claude Code reminds the agent once to capture, naming the pages the session’s changes touched. Set NIMBALYST_WIKI_NUDGE_MIN_EDITS to change how many edits trigger the reminder.
Step 4: Ask the wiki before you change something
/nimbalyst-wiki:recall payment retriesRecall answers from the wiki: each decision with who made it, when and what it was chosen over, and each open question with its owner, naming the pages it used. It says when a page is stale or marked outdated, and keeps what the wiki says apart from what it infers. If the wiki has nothing on the question, it says so in one line. See how recall finds decisions and the pages that cover your code.
You can also just ask, “why did we put retries in the event queue?”, and the agent uses recall on its own. Pages can name the code they cover in a paths field, so before Claude changes those files it can read the pages that explain them.
Step 5: Read and edit the wiki in your browser
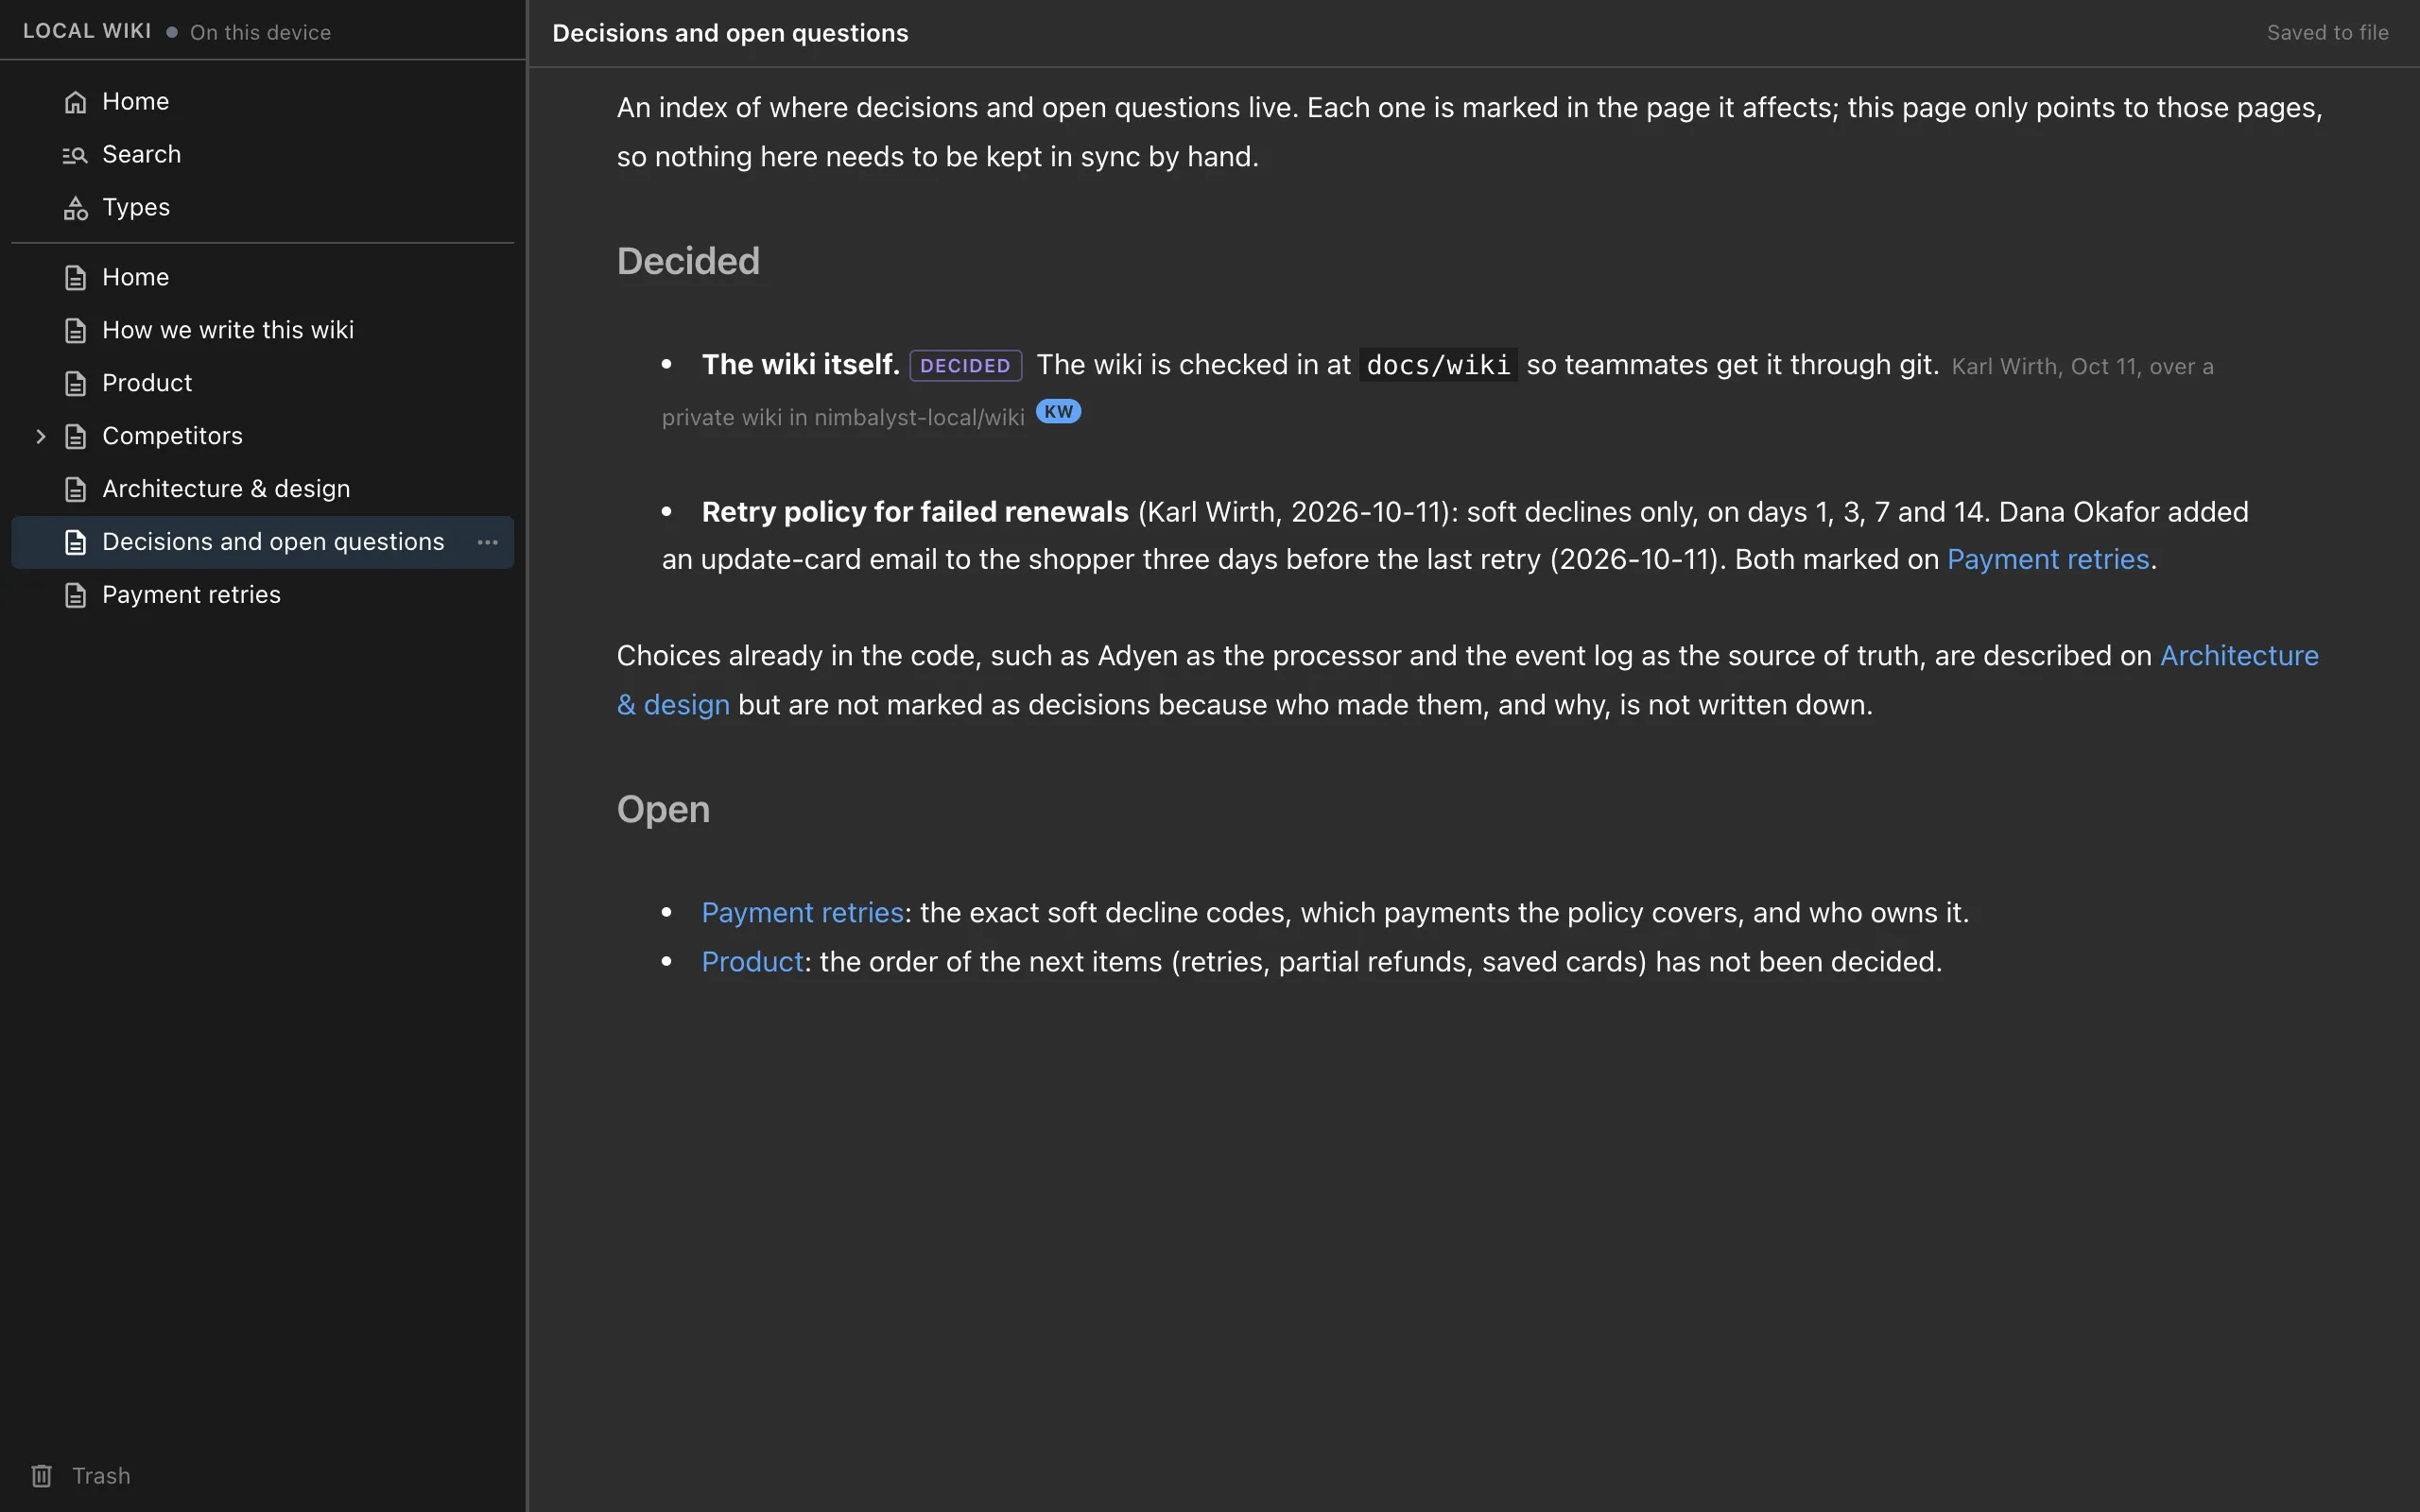
Ask Claude to “open the wiki in my browser.” The browser view opens with the page tree and the page editor, with nothing else to install. You can edit pages, drawings, mind maps, spreadsheets and mockups there, your edits save straight to the files, and what your agent writes shows up live. The view listens on your machine only and is protected by a token. The browser view docs list everything you can edit there.
An index page links to every decision and open question in the wiki, so you can catch up on a week of sessions in a few minutes.
If you also install the nim command line (npm install -g @nimbalyst/cli), nim wiki serve opens the same view from a shell.
Track things with typed pages and tables
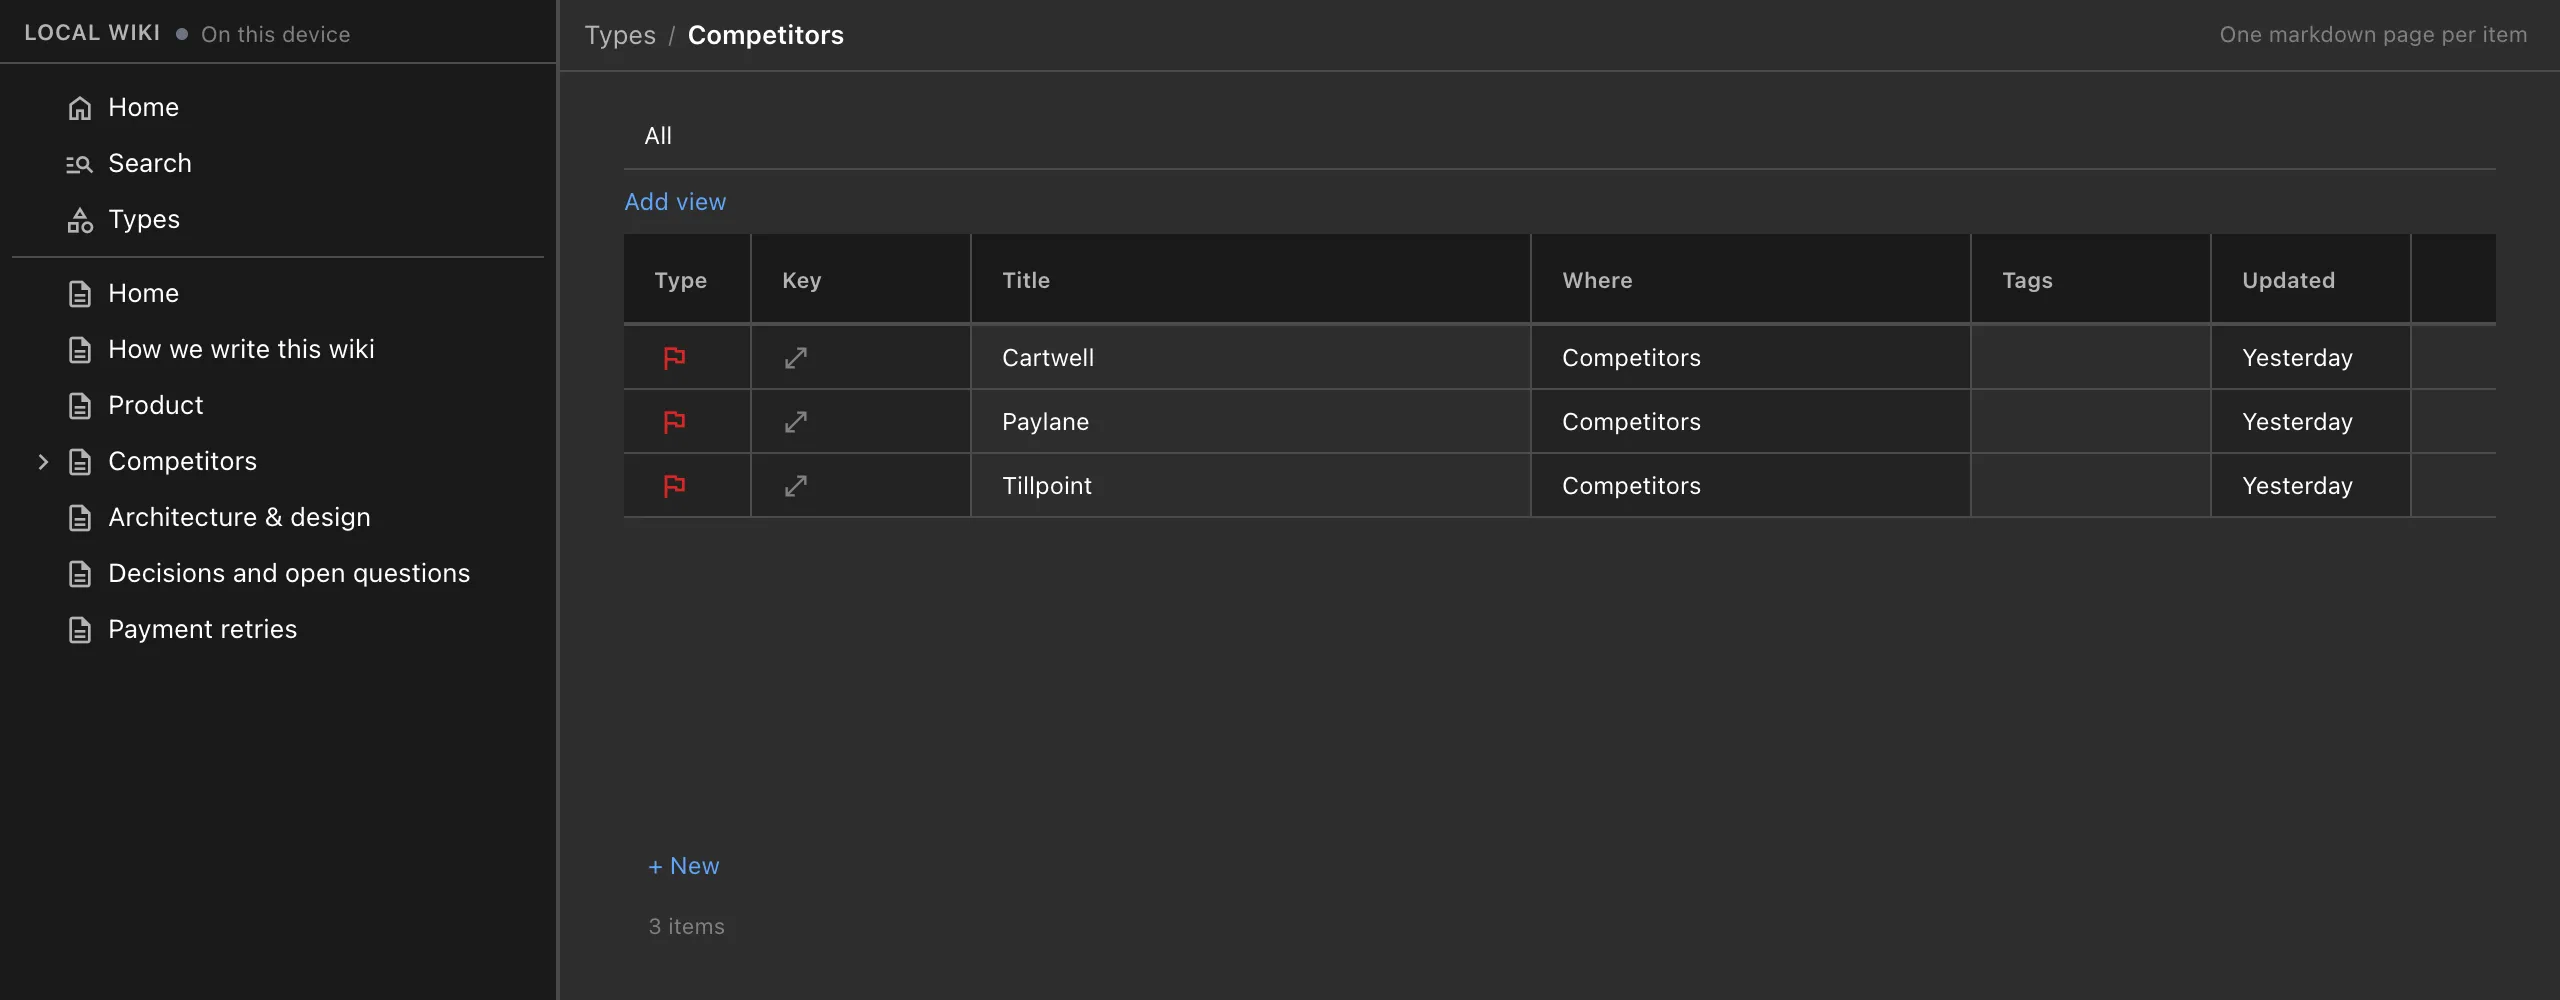
Ask Claude to track something and it creates a type with the fields you care about:
Track our competitors in the wiki: category, threat, setup speed and payment recovery for each.Each competitor gets its own page with those fields at the top, and the type keeps a table of every item. A type can also store its items as rows of one CSV file when the items do not need a page each. See typed pages and fields for how types are defined. Competitors, customers, features, interview notes and decision logs all work this way.
Pages hold more than text, too. Ask for a drawing of a flow, a mind map of open risks, a spreadsheet, a data model, a mockup of a screen or a canvas that lays pages side by side, and Claude builds it as a page you can edit in the browser. Each keeps its own file format, such as .excalidraw, .csv or .mockup.html, so other tools can still open it.
Where the files live, and whether to commit them
By default the wiki lives in nimbalyst-local/wiki, a folder git ignores, so it stays private to you. To share it through your repo, put it in a checked-in folder such as docs/wiki and diff and commit it like code. The location is set in .nimbalyst/local-wiki.json, and git worktrees share the main checkout’s wiki.
Every page is a markdown file with flat frontmatter. Links between pages are relative paths, so they work on GitHub and in any editor, and deleting a page moves it to a .trash folder from where it can be restored. The local wiki files docs page has the details.
How it fits with CLAUDE.md and auto memory
Claude Code already has two ways of carrying knowledge between sessions. CLAUDE.md holds the instructions you write for the agent. Auto memory holds notes Claude writes for its own next session. Both are written for the agent.
The wiki is written for you. It holds what was decided and why, what is still open, and what you are tracking, organized so a person can read it. Keep the one-line rule in CLAUDE.md (“retries go through the event queue”) and the decision behind it in the wiki. We go through all three in CLAUDE.md, auto memory and a wiki: where each fits.
If you have read Andrej Karpathy’s LLM Wiki gist, the shape will look familiar: the agent writes and maintains the wiki, and the person reads it. The Nimbalyst Wiki applies that pattern to a software project, with decisions and open questions as first-class parts of a page. We wrote about the gist in Karpathy’s LLM Wiki.
Keep the plugin up to date
Once a day the plugin checks GitHub for a newer version, and if there is one, the agent mentions it the next time it uses the wiki. The check sends nothing about you or your wiki, and NIMBALYST_WIKI_NO_UPDATE_CHECK=1 turns it off. To update by hand, run these and restart Claude Code:
claude plugin marketplace update nimbalyst-wiki
claude plugin update nimbalyst-wiki@nimbalyst-wiki
Use the same wiki in other agents
The wiki is a folder of files and a standard MCP server, so every agent you use can work on the same pages. Codex has the same plugin, and the Codex app, Cursor, VS Code, Cowork and any other MCP agent connect through nim mcp. See How to keep a project wiki with Codex and A project wiki in Cursor, VS Code and Cowork.
When your team needs the wiki too, run /nimbalyst-wiki:team and Claude moves it to Wiki Teams, where everyone edits the same pages in their browser and every teammate’s agents write into it. If you want the wiki next to your sessions and code, the free Nimbalyst app opens the same folder.
FAQ
How do I add a wiki to Claude Code? Run /plugin marketplace add nimbalyst/nimbalyst-wiki, then /plugin install nimbalyst-wiki@nimbalyst-wiki, then /nimbalyst-wiki:setup. You need Node.js 22 or later and no account.
Where does the wiki live? In nimbalyst-local/wiki in your project by default, which git ignores. Choose a checked-in folder such as docs/wiki to share it through git.
Does Claude Code update the wiki automatically? It reminds the agent once to capture after a session with a commit, a plan or several edits. Capture writes decisions into the pages they affect, and you can run it yourself at any time.
Can I edit the pages myself? Yes. Edit them in the browser view or in any editor; they are markdown files. The next session reads what you wrote.
Is it the same as Claude Code memory? No. CLAUDE.md and auto memory are written for the agent. The wiki is written for you, so you can think, organize and set direction.
The Nimbalyst Wiki page linked at the top has the install steps for every agent.
Related pages
-
Nimbalyst Wiki
A local wiki your coding agents write for you, so you can think, organize and set direction.
-
How to Keep a Project Wiki with Codex
The Codex CLI plugin, or one command for the Codex app and IDE extension.
-
Claude Code Memory vs a Wiki Your Agents Write
Where CLAUDE.md, AGENTS.md, auto memory and a wiki for you each fit.
-
Architecture Decision Records Written by Your Coding Agent
Decisions in the page they affect, with who, when and what was rejected.
-
Docs: Capture Decisions at the End of a Session
What capture writes, and how a decision is marked.
Related posts
-
Architecture Decision Records Written by Your Coding Agent
How to keep architecture decision records and a decision log when Claude Code and Codex make decisions faster than anyone writes them down: the agent records each decision in the page it affects, with who decided, when, what was rejected and a quote from the session.
-
How to Keep a Project Wiki with Codex
Add the free Nimbalyst Wiki to Codex with the Codex CLI plugin or one codex mcp add command for the Codex app and IDE extension. Codex writes a markdown wiki of decisions and open questions in your repo that you read and edit in your browser.
-
Overwhelmed Working with Coding Agents? Have Them Write You a Wiki
Running several Claude Code or Codex sessions produces more decisions and open questions than one person can track. Here is the approach we use: the agents distill their work into a short wiki for you, and you read, think and set direction.