Quickstart
Set up Nimbalyst in minutes. Open a project, connect a coding agent, and run your first AI session in a visual interface for Claude Code.
This page gets you from download to your first AI session: install the app, open a project folder, connect a coding agent, and learn the three modes you will work in. It takes a few minutes end to end.
Start by downloading the app from the Nimbalyst download page. Mac, Windows, and Linux builds are all there. On Linux, choose between an AppImage and a .deb package for Debian and Ubuntu; the .deb works on Ubuntu 24.04 and later, where AppArmor's user-namespace restriction blocks the AppImage.
Open a Project
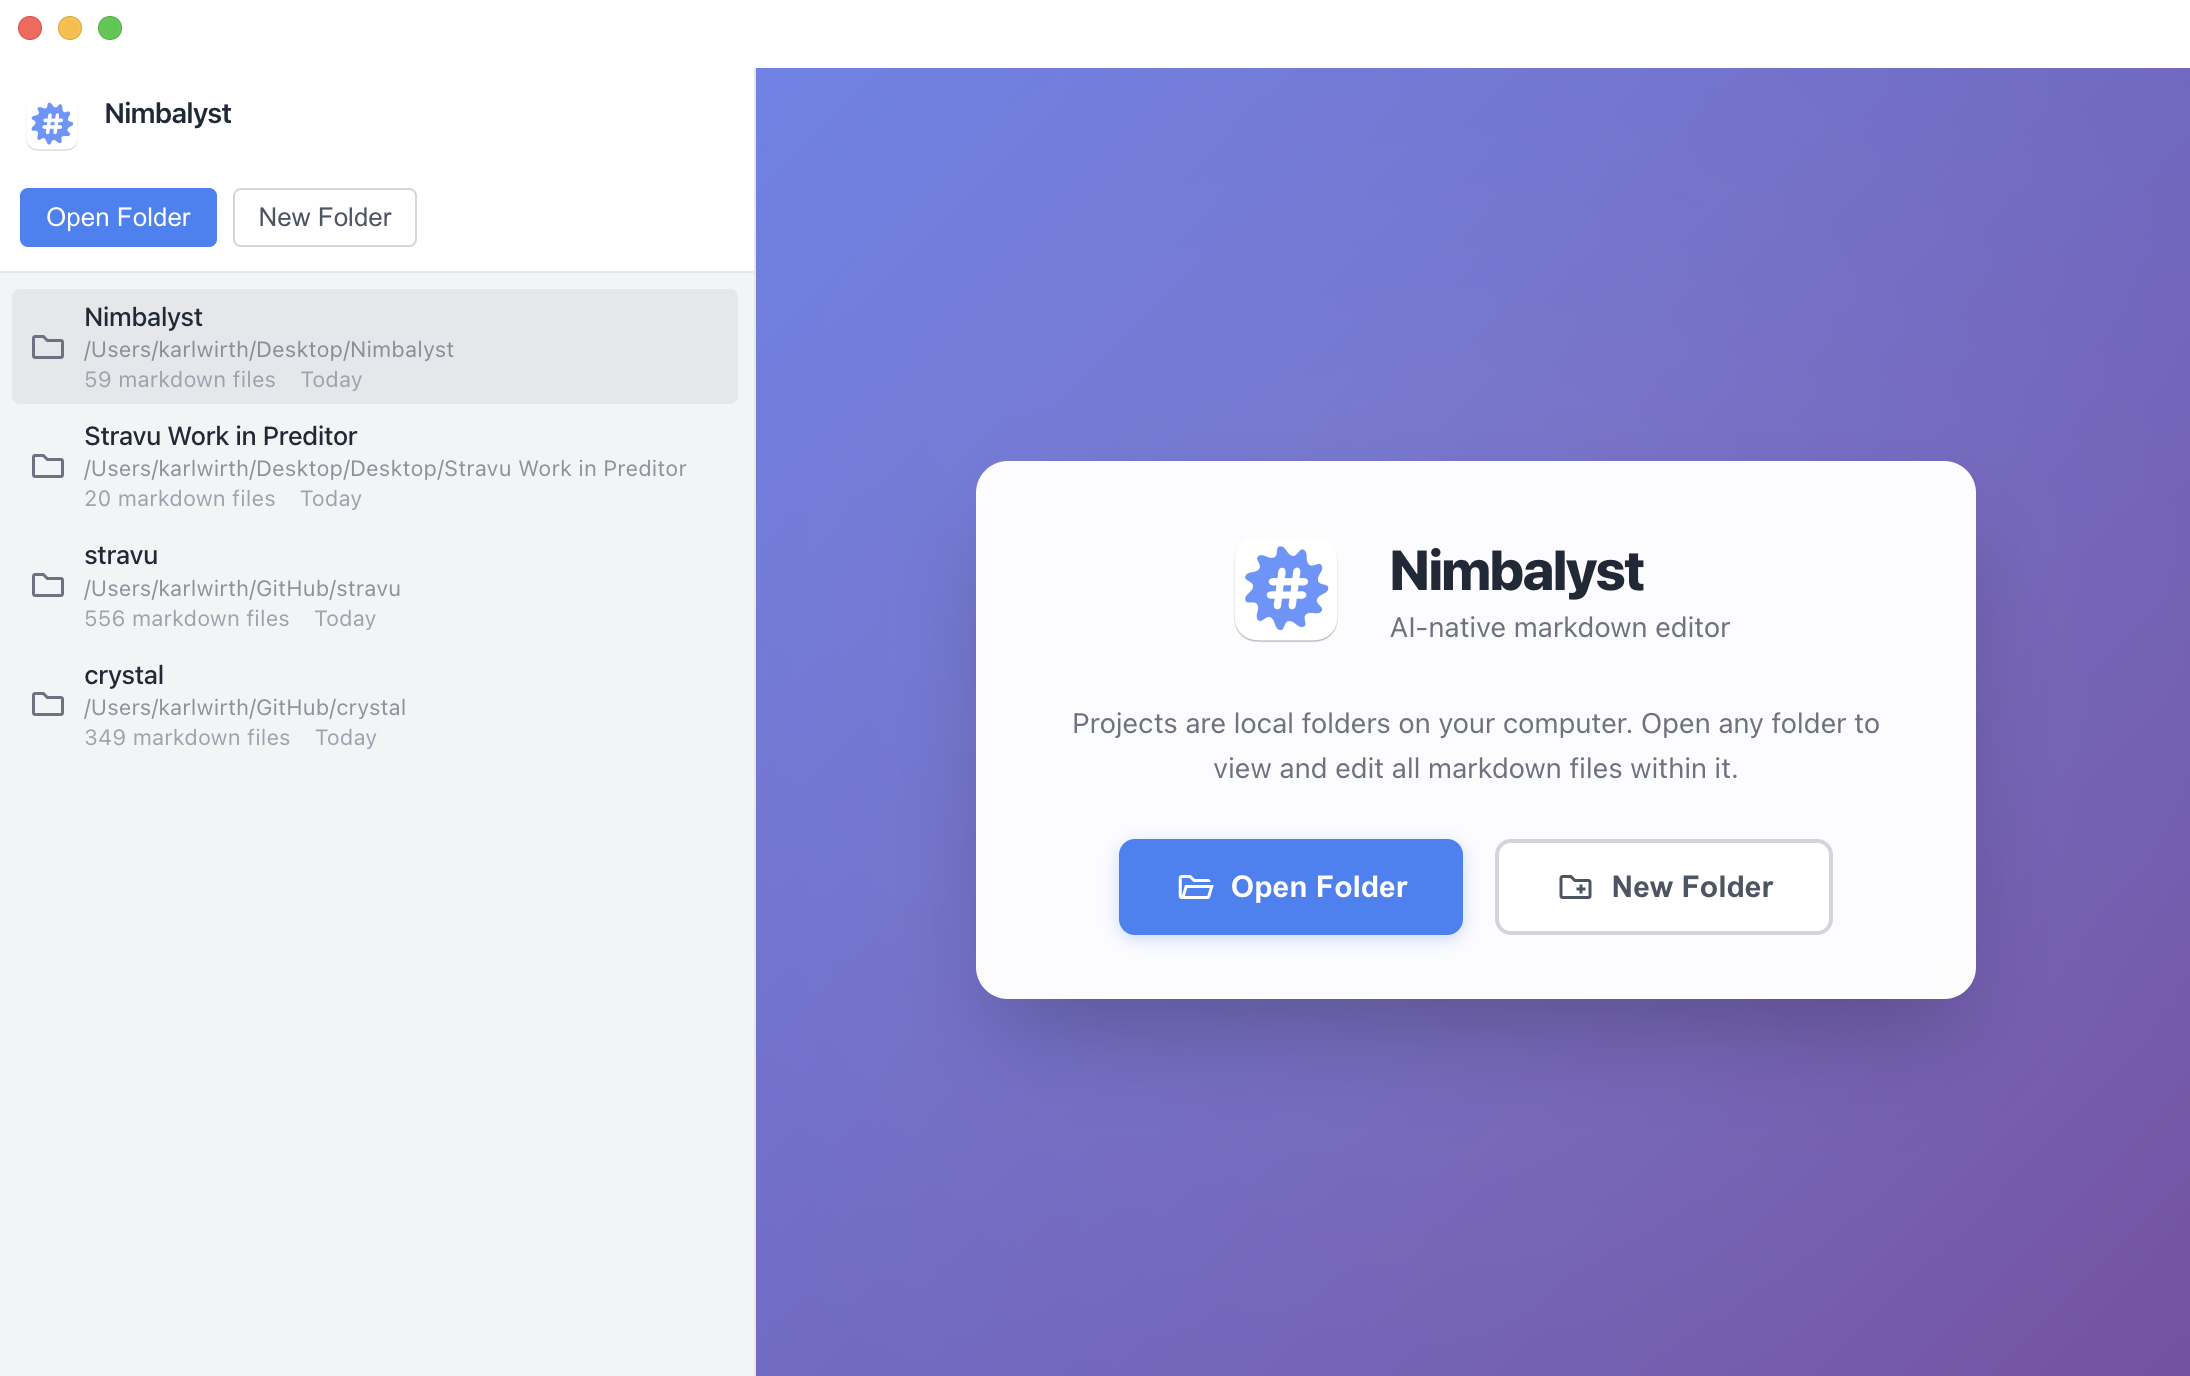
The Project Manager: open any folder as a project, or pick one of your recent projects from the list.
- A project is a folder opened in Nimbalyst. It keeps its own history, context, and window state, and that state is restored when you reopen the folder.
- If you have git repositories locally, open those; if not, create a folder such as
Nimbalyst Projectsand work there. - You can have multiple Nimbalyst windows open on different projects at the same time. A consistent color per project helps you tell them apart.
- Return to this screen from Window > Project Manager or Cmd+P to open another project.
- You can only view and edit files that are inside your project, but your coding agent can read and change files elsewhere on your computer if you give it permission.
Coding Agents
Nimbalyst includes provider integrations for Claude Agent and OpenAI Codex, so you do not need to install their command-line tools for the standard in-app agents.
- Open Settings > Application > AI Providers and choose a provider.
- For Claude Agent, sign in with an eligible Claude plan or enter an Anthropic API key. For OpenAI Codex, sign in with an eligible ChatGPT plan or enter an OpenAI API key.
- Start a session and select the provider from the composer. If it still needs authentication, Nimbalyst will guide you to the relevant settings.
Separate CLI providers are also available for workflows that specifically need an installed command-line agent. See AI provider setup for the differences and current authentication options.
Files Mode
Files mode (Cmd+E) is where you work on one file at a time with an agent beside you: interactive WYSIWYG markdown docs, mermaid diagrams, excalidraw drawings, html mockups, data models, CSV files, Calc Sheets, in-app browser previews, mind maps, and code.
- Edit the file in the center panel. See red/green diffs from your coding agent, review them, and accept them.
- Work with your agent in the right panel to edit this file, explore other files, or research the web.
- Navigate and manage your files in the left panel file manager.
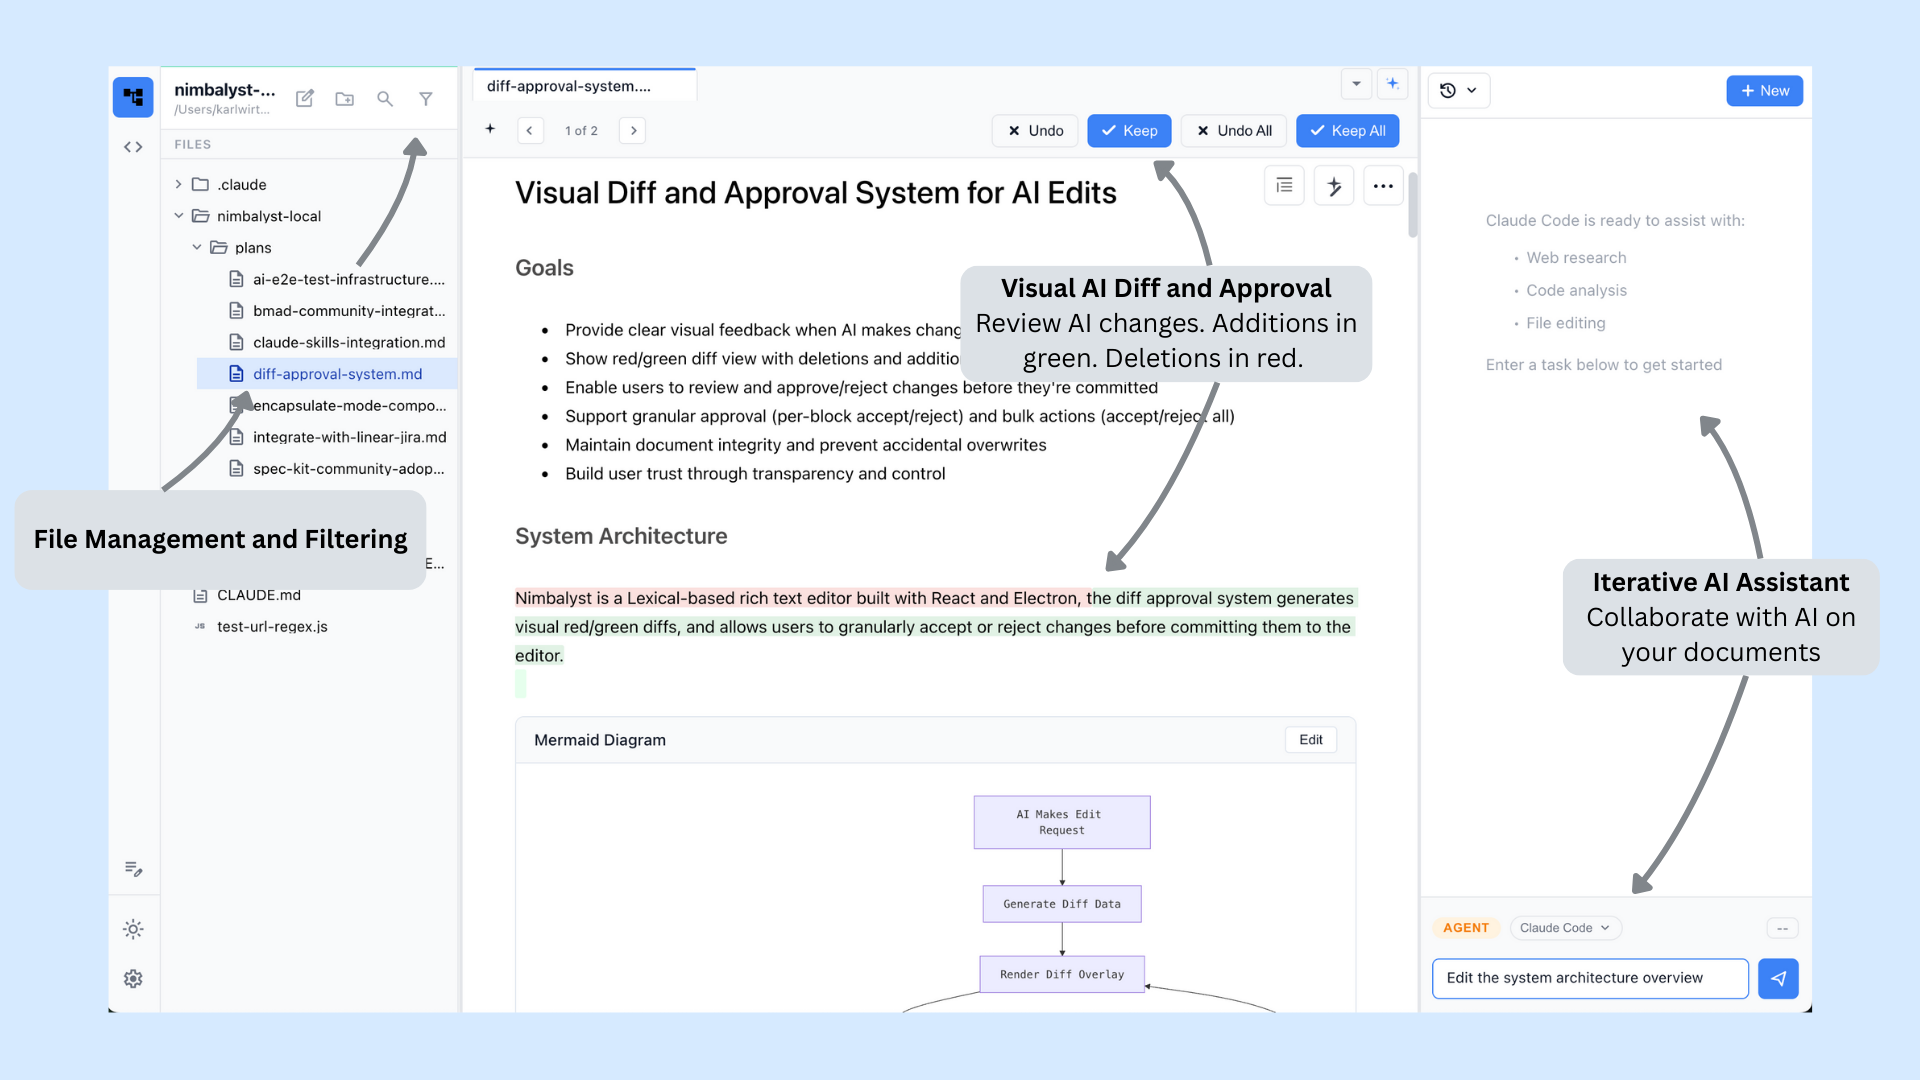
Files mode: file management on the left, red/green AI diffs to review in the document, and the AI assistant on the right.
Edit Markdown
- Nimbalyst uses standard Markdown files for documents, while visual editors use their own open or plain-text project files.
- Work in native markdown mode or in the WYSIWYG editor with markdown commands.
- Open a markdown document from your folder and start editing, or create one with the new-document icon or File > New (Cmd+N).
- Save with Cmd+S. Documents are saved as standard markdown files on disk, so you or other AIs can edit them in other applications too.
- Cmd+Y opens the file's history so you can review and restore earlier versions.
Calc Sheets
- Create a
.calc.mdfile when you want spreadsheet-style results in a markdown document. - Useful for pricing, estimates, budgets, unit conversions, and planning notes with formulas.
- You keep the source as plain text while Nimbalyst renders evaluated values beside it.
- See Calc Sheets.
Browser
- Open
.htmlfiles or live URLs in a real Chromium view inside Nimbalyst. - Preview generated pages, inspect mockups, and verify frontend changes without switching apps.
- Ask your agent to navigate, click, type, scroll, evaluate, or screenshot the page.
- See Browser.
Mind Map
- Create a
.mindmapfile when a roadmap, plan, or research topic is easier to understand spatially. - Mind maps give you an infinite canvas with branches, notes, tags, colors, and AI-assisted expansion.
- The file stays readable and versionable, so agents can edit it like other project files.
- See Mind Map.
AI Chat Panel
- Use the AI chat panel to edit your documents or do research.
- Select a provider from the dropdown. See AI Provider Setup and Notifications to set up Claude Code, Codex, and other providers.
- The agent can see and operate on your current document and your whole project.
- Type
@to attach a file or folder to the conversation. In markdown documents, putting a supported custom-editor file reference on its own line turns it into an inline embed. - Use the Actions dropdown to insert reusable prompts like reviewing changed files, planning an implementation, drafting release notes, or inspecting the current editor.
- AI edits show up as red/green diffs for your approval.
- Each AI conversation is a session that can be saved and resumed.
Edit Mockups
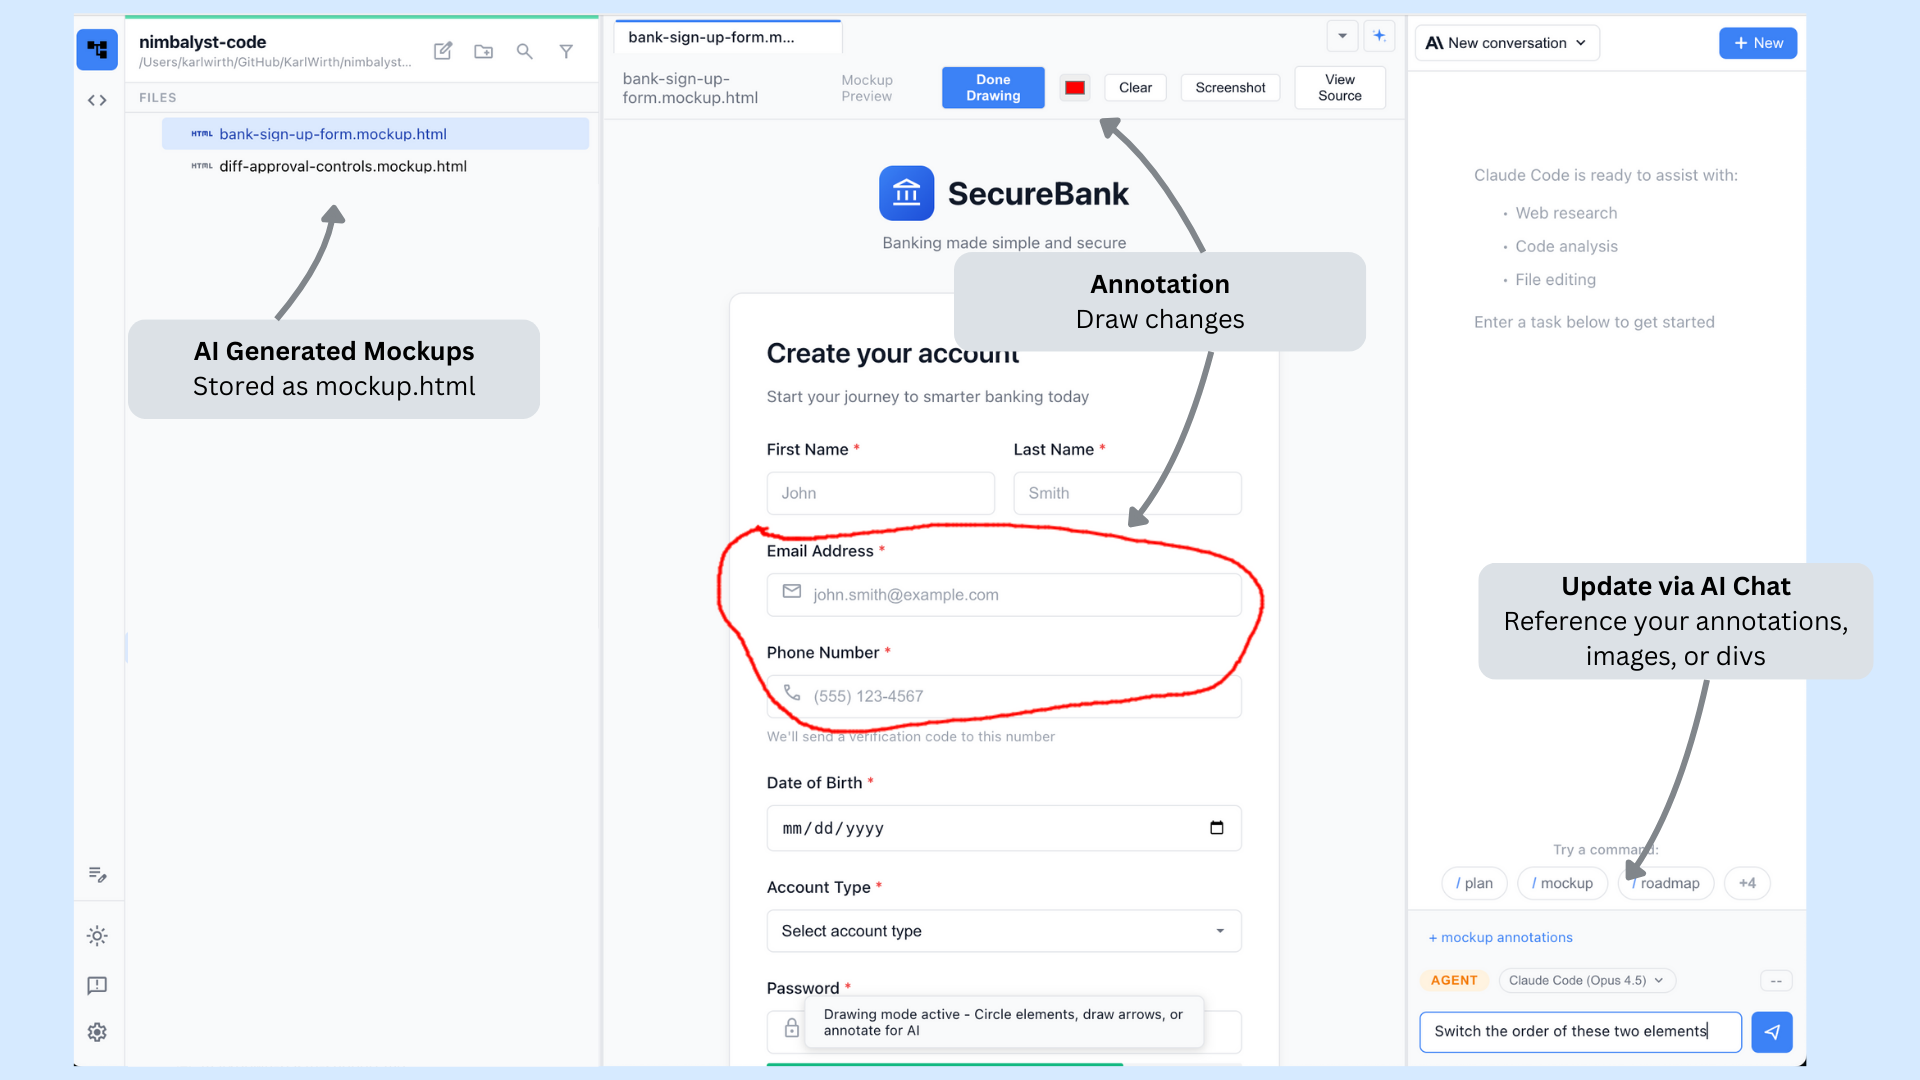
Draw an annotation on a mockup, then ask the agent to make the change you circled.
- Create a mockup by typing
/mockupin the agent panel, then click to open it in the editor. - Edit it by modifying the html source, by annotating it (drawing on it), or by selecting a div and asking the agent for changes.
- Embed the mockup into a document by typing
/in the document.
Agent Mode
Agent mode (Cmd+K) is where you run and manage AI sessions: organize, find, and continue your conversations, track the files each session changed, and step through and approve every diff, with all the power of Claude Code and Codex plus / command support and GitHub status tracking.
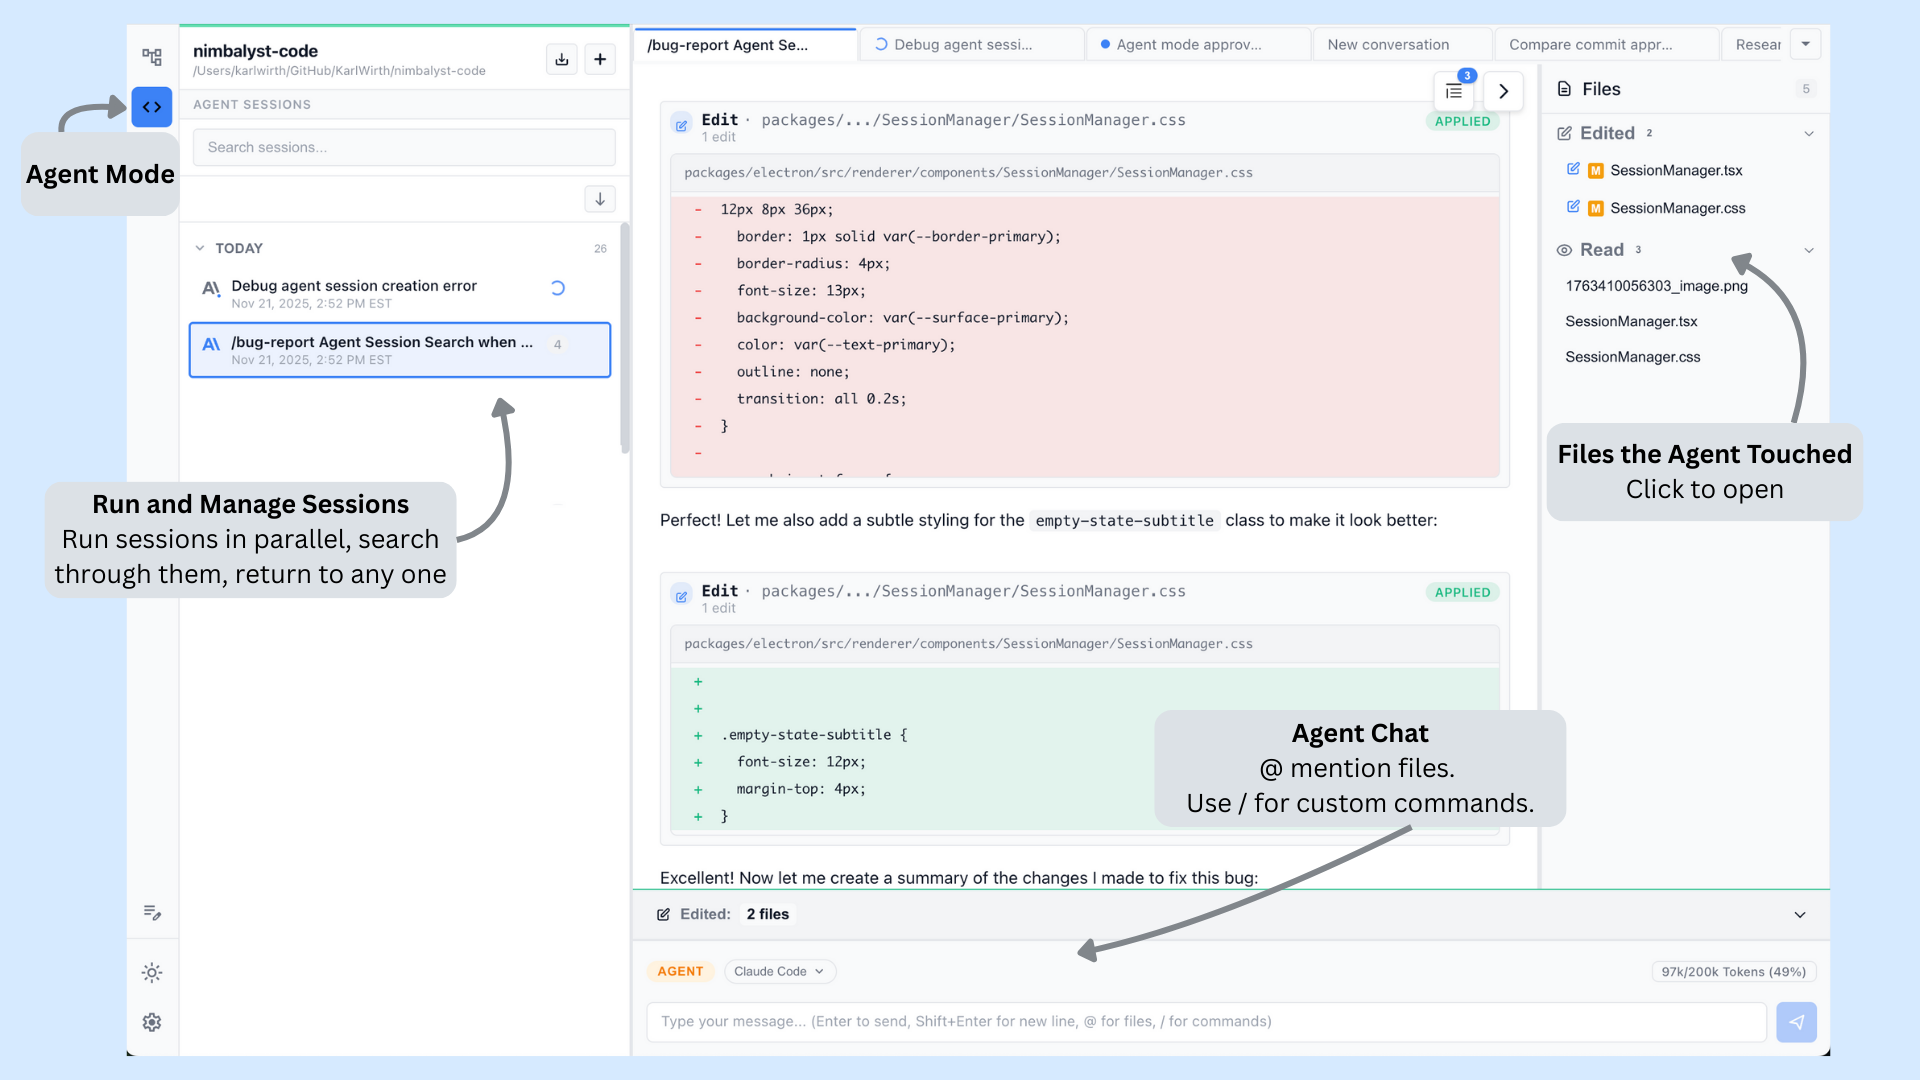
Agent mode: sessions on the left, the transcript with red/green edit cards in the center, and the files the agent touched on the right.
- Your conversation with the agent is in the central panel.
- The left panel lists your sessions. Group related sessions into workstreams.
- The right panel lists the files the agent touched in the session or workstream. Click a file to open it in the center; right-click to open it in Files mode.
If you already have a history of sessions in the Claude Code CLI, bring them into Nimbalyst with File > Import Claude Code Sessions.... See Import Claude Code Sessions.
Team and Collaboration Setup
To collaborate with other people in a project:
- Sign in under Settings > Account > Accounts.
- Make sure the project has a git remote named
origin. - Open Settings > Project > Sharing and create a team, join an invitation, or add the repository to an organization you already administer.
- Invite teammates from the organization's member settings.
- Open Collaboration mode to create shared documents, or right-click a supported local file and choose Share to Team.
- Open Trackers to work on shared tracker types or promote hybrid items into the team tracker.
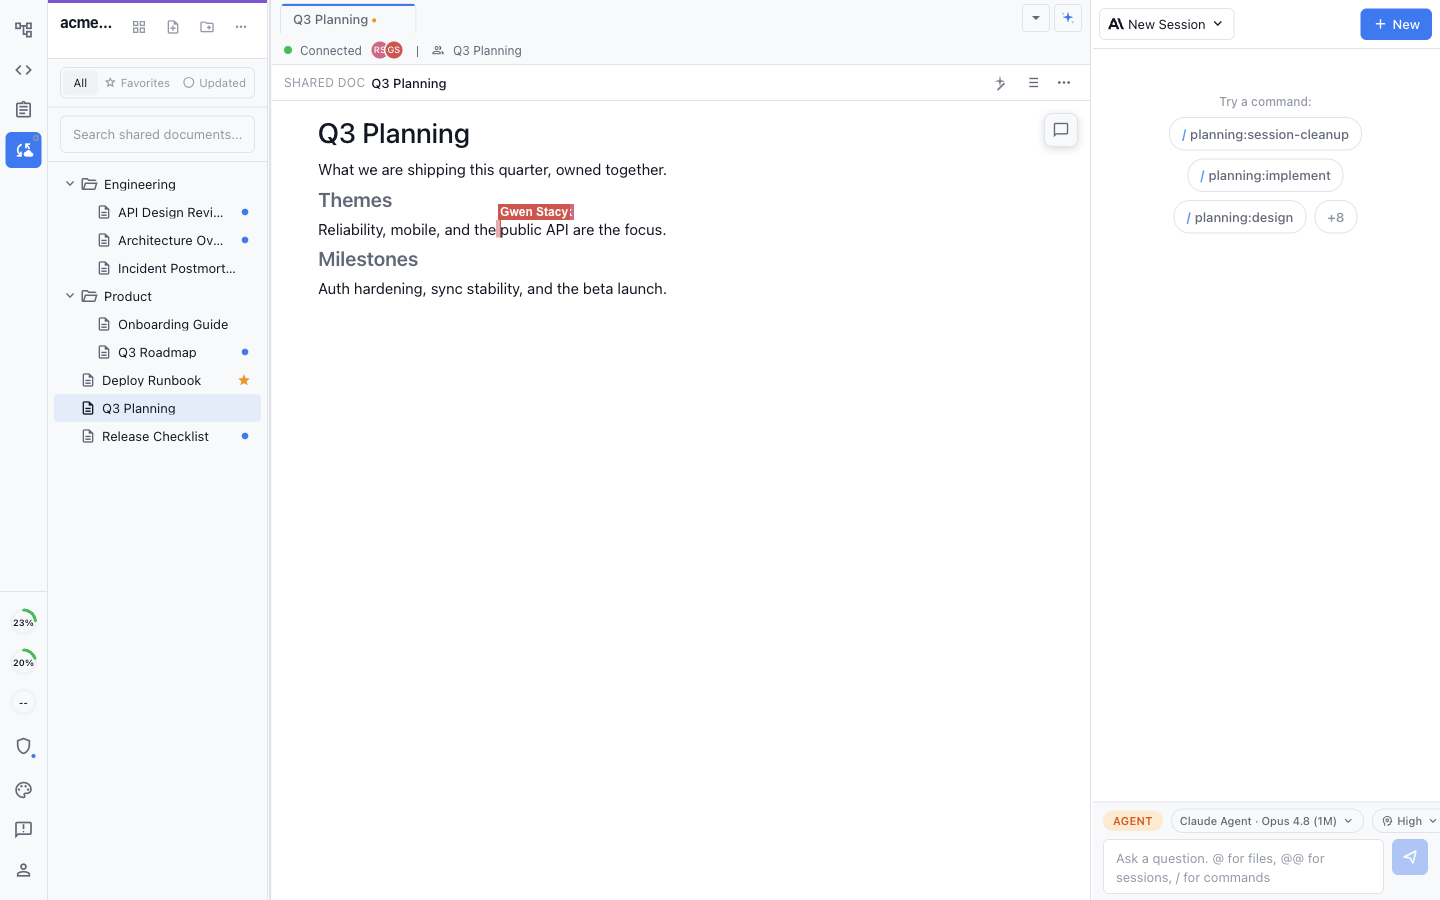
Once the team is connected, people and their agents can work together in the same shared documents and trackers.
See Set Up Nimbalyst Teams and Organizations for the complete settings flow and Team Collaboration Overview for how local and shared work fit together. To go further, Nimbalyst Teams: Step by Step walks the whole flow in seven steps with a screenshot for each.
Mobile App
Manage your AI coding agents on the go with the Nimbalyst mobile app:
- Session dashboard: see all active, completed, and paused sessions at a glance.
- Diff review: swipe through file changes with red/green diffs optimized for mobile.
- Resume and reassign: resume stalled sessions with a voice note or typed instruction from your phone.
- Push notifications: get notified when sessions complete, hit errors, or need approval.
- Desktop sync: changes approved on mobile appear on desktop right away.
- All agents: manage Claude Code and Codex sessions from one app.
See the mobile app docs for details.
Shortcuts
Open Help > Keyboard Shortcuts or press Cmd+/ for the full list. A few to start with:
- Cmd+O: Unified Quick Open in the Files tab, with tabs for content search, sessions, prompts, projects, and trackers
- Cmd+K: Agent mode
- Cmd+E: Files mode
- Cmd+N: New file or session
- Cmd+Shift+N: New AI session from any mode
- Cmd+Shift+K: Session kanban board
- Cmd+[ / Cmd+]: Navigate back and forward
- Cmd+Shift+V: Force-paste as plain text
15-minute guided quickstart
Learn Nimbalyst by doing real work in about 15 minutes. Product managers, founders, and designers finish with a working brief and an embedded mockup. Developers finish with a run-and-test guide, an embedded architecture diagram, and two agents running in parallel.
Open a workspace in Nimbalyst, start a new chat, and paste this prompt:
Fetch https://raw.githubusercontent.com/nimbalyst/skills/main/skills/getting-started/quickstart.md, save it to nimbalyst-quickstart/quickstart.md in this workspace, then run it as the Nimbalyst quickstart. Wait for me at every exercise.The agent saves the quickstart in your workspace, helps you choose the product or engineering track, and waits for you at each exercise. Everything it creates stays under nimbalyst-quickstart/, so you can remove the folder afterward if you do not want to keep the results.
The Nimbalyst quickstart on GitHub is the source of truth.